第11章Webアプリケーション開発
Creating the React Native App ComponentsReact Nativeアプリのコンポーネントの作成
The packages used by the React Native app for navigation and other features are different from the packages used by React. To install the required packages, in the reactnativefrontend/ directory, run the following list of commands:
英語のヒント
React Nativeアプリがナビゲーションなどの機能に使うパッケージは、Reactが使うパッケージとは異なる。必要なパッケージをインストールするには、reactnativefrontend/ディレクトリで、次の一連のコマンドを実行する。
$ npm install @react-navigation/native@6.0.7
$ npm install @react-navigation/native-stack@6.3.0
$ npm install axios@0.25.0
$ npm install moment@2.29.1
$ npm install react-native-modal@13.0.0
$ npm install react-native-safe-area-context@3.3.2
$ npm install react-native-screens@3.10.2
$ npm install react-native-snackbar@2.4.0
$ npm install react-native-vector-icons@9.0.0
The first step is to create the Todo component. In the reactnativefrontend/ directory, create the directory src/ Screens/. In the src/Screens/ directory, create the file TodoList.js. The following code shows the imports required to create the screen components.
最初に、Todoコンポーネントを作成する。reactnativefrontend/ディレクトリ内にsrc/Screens/ディレクトリを作り、その中にTodoList.jsファイルを作成する。次のコードは、画面のコンポーネントを作るために必要なインポートを示している。
import React, {useState, useEffect} from 'react';
import {
  View,
  Text,
  StyleSheet,
  TextInput,
  FlatList,
  TouchableOpacity,
  Dimensions,
  StatusBar,
  Alert,
} from 'react-native';
import axios from 'axios';
import {COLORS} from '../utils/colors';
import MaterialIcon from 'react-native-vector-icons/MaterialIcons';
import MaterialCommunityIcon from 'react-native-vector-icons/MaterialCommunityIcons';
import Modal from 'react-native-modal';
import Snackbar from 'react-native-snackbar';
import {duration} from 'moment';
Once this is done, the following code includes the
return() function that renders the screen components.これができたら、次のコードで、画面のコンポーネントを描画するreturn()関数を組み込む。
return (
  <View style={styles.container}>     <StatusBar backgroundColor={COLORS.DARKALT} />
    <Text style={styles.heading}>Welcome to Todo List App!</Text>     <Text
style={styles.heading}>Your Tasks</Text>     {todos.length == 0 ? (       <View
style={styles.center}>         <MaterialCommunityIcon           name="note-multiple"
          size={90}           color={COLORS.LIGHTALT}         />         <Text
style={styles.noTasksText}>No Tasks Added</Text>       </View>     ) : (       <>
        <View style={styles.todosContainer}>           <FlatList
            data={todos}             renderItem={({item}) => (               <View
style={styles.todo}>                 <Text                   style={item.complete ?
styles.completedStyle : styles.text}>                   {item.title}
                </Text>                 <TouchableOpacity
                  style={styles.deleteTodo}                   onPress={() =>
deleteTodo(item._id)}>                   <Text style={{color: COLORS.WHITE}}>X</Text>
                </TouchableOpacity>               </View>             )}           />
        </View>         <TouchableOpacity           style={styles.addButton}
          onPress={() => {             setModalActive(true);           }}>
          <MaterialIcon name="add" size={32} color={COLORS.LIGHT} />
        </TouchableOpacity>       </>
    )}

    <Modal
      isVisible={modalActive}
      animationIn={'slideInUp'}
      animationOut={'slideInDown'}>
      <View style={styles.modalView}>         <TouchableOpacity
          style={styles.modalCloseBtn}           onPress={() =>
setModalActive(false)}>           <Text style={styles.modalCloseBtnText}>X</Text>
        </TouchableOpacity>         <Text style={styles.addTaskHeading}>Add
Task</Text>         <TextInput           style={styles.taskInput}
          placeholder="Enter task here.."           onChangeText={text =>
setNewTodo(text)}           value={newTodo}         />         <TouchableOpacity
style={styles.createBtn} onPress={() => addTodo()}>           <Text
style={styles.createBtnText}>Create Task</Text>         </TouchableOpacity>
      </View>
    </Modal>
  </View>
);
The following code creates the modal pop-up screen that is used to create a Todo list.
次のコードは、Todoリストの作成に使う、モーダルのポップアップ画面を作る。
<Modal
  isVisible={modalActive}
  animationIn={'slideInUp'}
  animationOut={'slideInDown'}>
  <View style={styles.modalView}>     <TouchableOpacity
      style={styles.modalCloseBtn}       onPress={() => setModalActive(false)}>
      <Text style={styles.modalCloseBtnText}>X</Text>     </TouchableOpacity>
    <Text style={styles.addTaskHeading}>Add Task</Text>     <TextInput
      style={styles.taskInput}       placeholder="Enter task here.."
      onChangeText={text => setNewTodo(text)}       value={newTodo}     />
<TouchableOpacity style={styles.createBtn} onPress={() => addTodo()}>       <Text
style={styles.createBtnText}>Create Task</Text>     </TouchableOpacity>   </View>
</Modal>
Next, update the reactnativefrontend/App.js file, as shown in the following code, to render the screen components declared in the TodoList.js file.
次に、TodoList.jsファイルで宣言した画面のコンポーネントを描画するため、reactnativefrontend/App.jsファイルを、次のコードのように更新する。
import React from 'react';
import {NavigationContainer} from '@react-navigation/native';
import {createNativeStackNavigator} from '@react-navigation/native-stack';
import TodoList from './src/Screens/TodoList';

const Stack = createNativeStackNavigator();

const App = () => {
  return (
    <NavigationContainer>       <Stack.Navigator>         <Stack.Screen
          name="TodoList"           component={TodoList}
          options={{headerShown: false}}         />       </Stack.Navigator>
    </NavigationContainer>
  );
};
export default App;
When this is done, relaunch the Metro bundler and deploy the native application by running the following commands:
できたら、次のコマンドでMetroバンドラーを再起動し、ネイティブアプリケーションを配置する。
$ npx react-native start
$ npx react-native run-android
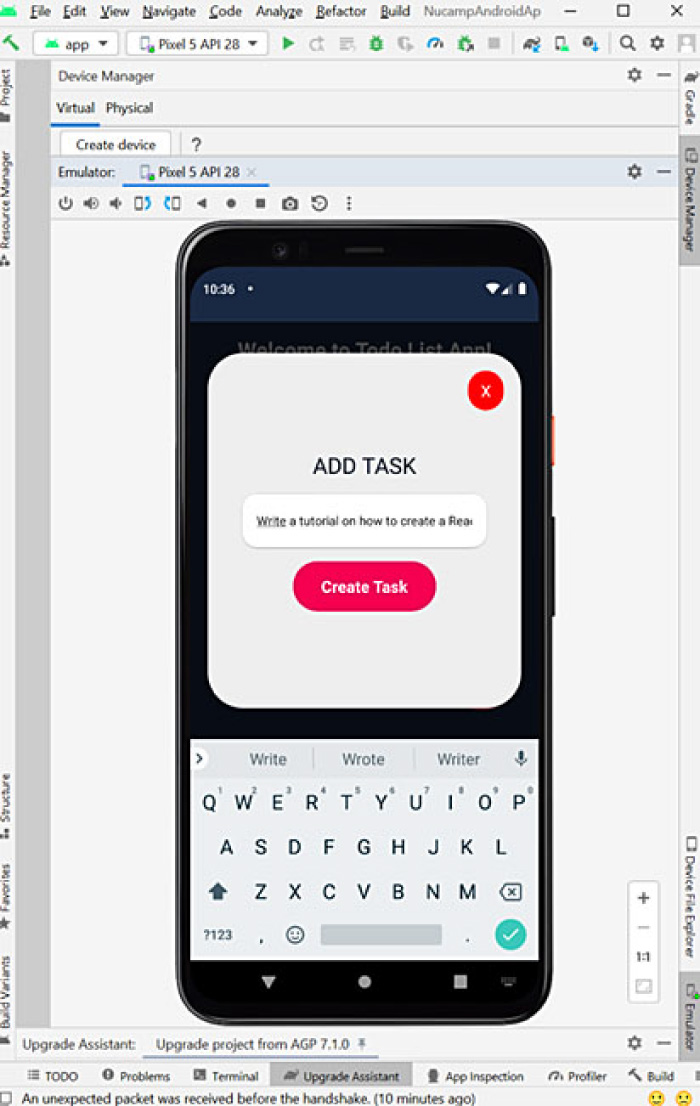
Next, create a Todo item (Figure 11.44).
次に、Todo項目を作成する(図11.44)。
Android studio is a trademark of Google LLC. · 原著の利用条件・ソフトウェアの権利表示参照 · Source出典
Figure 11.44 After relaunching the Metro bundler and deploying the native application, this screen allows users to create a Todo item. (Android studio is a trademark of Google LLC.)
図11.44 Metroバンドラーを再起動してネイティブアプリケーションを配置すると、この画面でTodo項目を作成できる。(Android StudioはGoogle LLCの商標。)
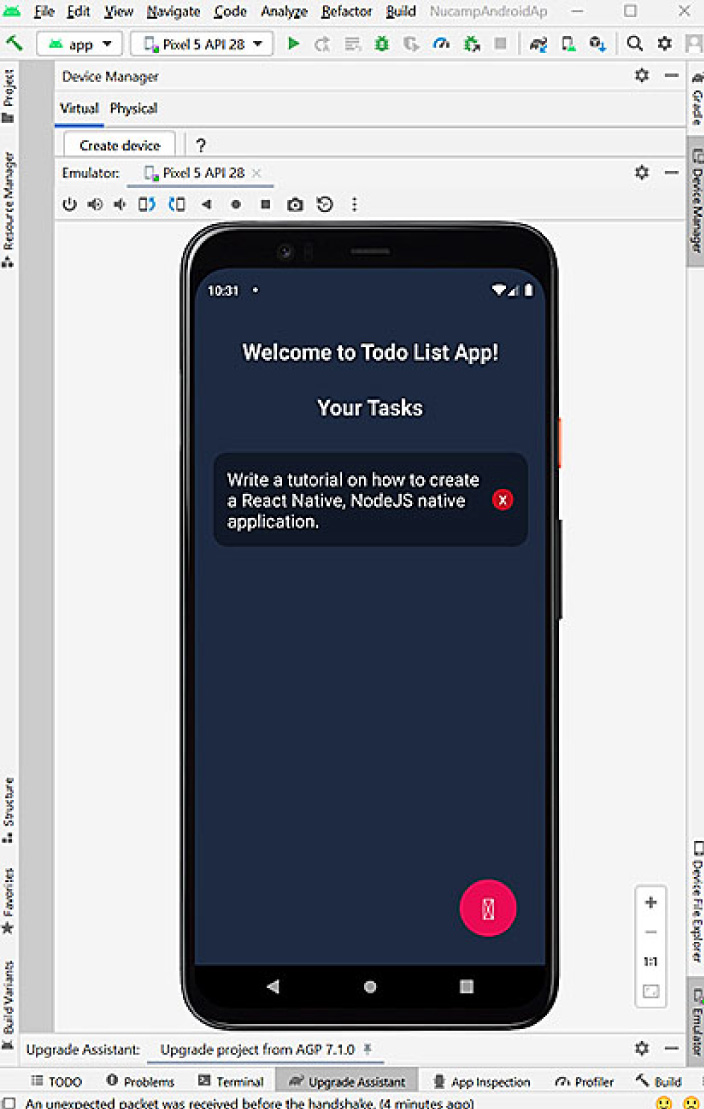
After the Todo item is created, it should appear on the main screen as seen in Figure 11.45.
Todo項目を作成すると、図11.45のように、メイン画面へ表示されるはずである。
Android studio is a trademark of Google LLC. · 原著の利用条件・ソフトウェアの権利表示参照 · Source出典
Figure 11.45 Here is how the Todo item should appear on the main screen. (Android studio is a trademark of Google LLC.)
図11.45 メイン画面でのTodo項目の表示例。(Android StudioはGoogle LLCの商標。)
Connecting the Front-End Native App with the Back-End Node AppフロントエンドのネイティブアプリとバックエンドのNodeアプリの接続
The next step is to connect the front-end React Native app with the back-end Node app. To do this, open reactnativefrontend/src/Screens/Todolist.js. Add the API_BASE variable and configure the IP address to the local computer, running the Express web server, as shown in the following code.
次に、フロントエンドのReact Nativeアプリを、バックエンドのNodeアプリに接続する。そのために、reactnativefrontend/src/Screens/Todolist.jsを開く。次のコードのように、API_BASE変数を追加し、Express Webサーバーを動かしているローカルコンピューターのIPアドレスを設定する。
import axios from 'axios';
import {COLORS} from '../utils/colors';
import MaterialIcon from 'react-native-vector-icons/MaterialIcons';
import MaterialCommunityIcon from 'react-native-vector-icons/MaterialCommunityIcons';
import Modal from 'react-native-modal';
import Snackbar from 'react-native-snackbar';
import {duration} from 'moment';

const width = Dimensions.get('window').width;

const API_BASE = 'http://192.168.1.183:8080';
Next, add the Axios calls to interact with the REST API provided via the Express web server to interact with the MongoDB database.
次に、Express Webサーバーを通じて提供されるREST APIと通信し、MongoDBデータベースとやり取りするため、Axiosの呼び出しを追加する。
const [todos, setTodos] = useState([]);
  const [modalActive, setModalActive] = useState(false);
  const [newTodo, setNewTodo] = useState('');

  useEffect(() => {
    GetTodos();
  }, [todos]);

  const GetTodos = () => {
    axios
      .get(`${API_BASE}/api/todos`)
      .then(response => {
        setTodos(response.data);
      })
      .catch(err => {
        console.error('Error: ', err);
        Snackbar.show({
          text: '' + err,
          duration: Snackbar.LENGTH_LONG,
          backgroundColor: 'red',
          textColor: COLORS.WHITE,
        });
      });
  };

  const completeTodo = async id => {
    const data = await axios.put(`${API_BASE}/api/todos/${id}`);

    setTodos(todos =>
      todos.map(todo => {
        if (todo._id === data._id) {
          todo.complete = data.complete;
        }

        return todo;
      }),
    );
  };

  const deleteTodo = async id => {
    const data = await axios.delete(`${API_BASE}/api/todos/${id}`);

    setTodos(todos => todos.filter(todo => todo._id !== data._id));
  };

  const addTodo = async () => {
    if (newTodo == '') {
      Alert.alert('Error!', 'Please enter a task first!');
      return;
    } else {
      await axios
        .post(`${API_BASE}/todo/new`, {
          text: newTodo,
        })
        .then(function (response) {
          const data = response.data;
          setTodos([...todos, data]);
          setModalActive(false);
          setNewTodo('');
        })
        .catch(function (error) {
          console.log('Error: ', error);
        });
    }
  };