第11章Webアプリケーション開発
Installing Bootstrap and Other DependenciesBootstrapとその他の依存パッケージのインストール
The next step is to install the packages for bootstrap and reactstrap, which are necessary to use Bootstrap in a React app. To do this, in the reactfrontend/ directory, run the following commands:
次に、ReactアプリでBootstrapを使うために必要な、bootstrapとreactstrapのパッケージをインストールする。そのために、reactfrontend/ディレクトリで次のコマンドを実行する。
$ npm install bootstrap@4.6.0 reactstrap@8.9.0 --legacy-peer-deps
$ npm install react-bootstrap
Next, import the Bootstrap4 CSS file into the React application. To do this, open reactfrontend/src/index.js and add the following Bootstrap import.
次に、Bootstrap4のCSSファイルをReactアプリケーションへインポートする。そのために、reactfrontend/src/index.jsを開き、次のBootstrapのインポートを追加する。
import React from 'react';
import ReactDOM from 'react-dom';
import 'bootstrap/dist/css/bootstrap.css';
import './index.css';
import App from './App';
import reportWebVitals from './reportWebVitals';

ReactDOM.render(
  <React.StrictMode>     <App />   </React.StrictMode>,
  document.getElementById('root')
);

// If you want to start measuring performance in your app, pass a function
// to log results (for example: reportWebVitals(console.log))
// or send to an analytics endpoint. Learn more: https://bit.ly/CRA-vitals
reportWebVitals();
Create the React ComponentsReactコンポーネントの作成
The next step is to create the React components. The React user interface is rendered from the reactfrontend/ src/App.js component. The reactfrontend/src/App.js file is generated when the React application is created. This is the main component of the React application, and all other components are added to the reactfrontend/src/App.js component. A few imports are added to the reactfrontend/src/App.js file, as shown in the following code. This includes an import for App.css. Customized CSS rules are added to reactfrontend/src/ App.css.
次に、Reactのコンポーネントを作成する。Reactの利用者インターフェースは、reactfrontend/src/App.jsコンポーネントから描画される。reactfrontend/src/App.jsファイルは、Reactアプリケーションの作成時に生成される。これはReactアプリケーションの主なコンポーネントであり、ほかのすべてのコンポーネントは、このreactfrontend/src/App.jsコンポーネントに追加する。次のコードのように、reactfrontend/src/App.jsファイルへいくつかのインポートを追加する。App.cssのインポートも含まれる。独自のCSS規則は、reactfrontend/src/App.cssに追加する。
//import logo from './logo.svg';
import './App.css';
import React, { Component } from "react";
import Modal from "./components/Modal";
import Nav from "./components/NavComponent";
import axios from "axios";
import { Button, Form, FormGroup, Label, Input } from 'reactstrap';
To compare with the Django web application in 11.2 Sample Responsive WAD with Bootstrap and Django, customized CSS rules were added to the style.css file in the static/ directory, as described in Creating the Templates.
11.2「BootstrapとDjangoによるレスポンシブWebアプリケーション開発の例」のDjangoアプリケーションと比べると、そちらでは「テンプレートの作成」で説明したように、独自のCSS規則をstatic/ディレクトリ内のstyle.cssファイルへ追加した。
Next, look at the following code, which shows App is a class component that extends React’s Component class. All state data is added to the this.state variable in the constructor.
次のコードを見ると、Appは、ReactのComponentクラスを拡張するクラスコンポーネントである。すべての状態データは、コンストラクター内でthis.state変数に追加する。
4 Boostrap is a web content framework documented at getbootstrap.com.
4 Bootstrapは、getbootstrap.comに文書が用意されている、Webコンテンツ用のフレームワークである。
class App extends Component {
  constructor(props) {
    super(props);
    this.state = {
      todoChecked: false,
      todoList: [],
      categories: [],
      description: "",
      modal: false,
      activeItem: {
        title: "",
        description: "",
        completed: false,
      },
    };
  }
The next code snippet shows that every class component must include a
render() function. This function returns the components that construct the user interface for the Todo web application.英語のヒント
次のコード例が示すように、すべてのクラスコンポーネントにはrender()関数が必要である。この関数は、Todo Webアプリケーションの利用者インターフェースを構成するコンポーネントを返す。
render () {
    return(
      <main>         <Nav />         <div className="container mt-5 pl-3">
          <h1>Todo List</h1>           <Form>             <div
className="inputContainer">                 <FormGroup>                   <Label
htmlFor="description">Description</Label>                   <Input type="text"
id="description" name="description"                       placeholder="Description"
                      value={this.state.description}                       />
                </FormGroup>             </div>             <div
className="inputContainer half last">                 <FormGroup>
                  <Label htmlFor="category">Category</Label>                   <Input
id="category" className="taskCategory" type="select" name="category_select"
                    value={this.state.contactType}                     >
                    <option className="disabled" value="">Choose a category</option>
                    <option>Work</option>
                    <option>Personal</option>                   </Input>
                </FormGroup>             </div>             <div
className="inputContainer half last right">               <FormGroup>
                  <Label htmlFor="description">Due Date</Label>
                  <Input type="text" id="description" name="description"
                      placeholder="Due Date (mm/dd/yyyy)"
                      value={this.state.description}                       />
                </FormGroup>             </div>             <div className="row">
                <Button                   className="taskAdd"
                  name="taskAdd" type="submit"                 >
                  Edit                 </Button>                 <Button
                  className="taskDelete ml-1"                   name="taskDelete"
                  type="submit"
                  onclick="$('input#sublist').click();"                 >
                  Delete                 </Button>             </div>
          </Form>           <ul className="taskList">{this.renderItems()}</ul>
        </div>       </main>
    )
  }
Connecting the React Front End to the Node Back EndReactのフロントエンドとNodeのバックエンドの接続
The final step to create the Todo web application is to configure the React application so it can make requests to the API endpoints of the Node application. The React application uses Axios to fetch data by making requests to a given endpoint. To install Axios, run the following command in the reactfrontend/ directory:
英語のヒント
Todo Webアプリケーション作成の最後の手順は、NodeアプリケーションのAPIエンドポイントに要求を送れるよう、Reactアプリケーションを設定することである。ReactアプリケーションはAxiosを使い、指定されたエンドポイントへ要求を送ってデータを取得する。Axiosをインストールするには、reactfrontend/ディレクトリで次のコマンドを実行する。
$ npm install axios@0.21.1Next, add a proxy to the Node application. The proxy will help tunnel API requests from the React application to http://localhost:8080 where the Node application will receive and handle the requests. To do this, open the reactfrontend/package.json file and add the following proxy.
英語のヒント
次に、Nodeアプリケーションへのプロキシを追加する。プロキシは、ReactアプリケーションからのAPIリクエストをhttp://localhost:8080へ通し、そこでNodeアプリケーションが要求を受信して処理できるようにする。そのために、reactfrontend/package.jsonファイルを開き、次のプロキシを追加する。
{
  "name": "reactfrontend",
  "version": "0.1.0",
  "private": true,
  "proxy": "http://localhost:8080",
  "dependencies": {
The next step is to create a service on the front end to send HTTP requests to the back end. This process uses Axios and is similar to how routes were created on the back-end side. The service will export CRUD functions and a finder method to interact with the MongoDB database. To do this, in the reactfrontend/ directory, create the services/ directory. Then, in the services/ directory, create the tile TodoService.js and add the following code.
次に、バックエンドへHTTPリクエストを送るサービスを、フロントエンドに作る。この処理にはAxiosを使い、バックエンド側でルートを作成した方法と似ている。このサービスは、MongoDBデータベースとやり取りするCRUD関数と、検索用のメソッドをエクスポートする。そのために、reactfrontend/ディレクトリにservices/ディレクトリを作成する。services/ディレクトリ内にTodoService.jsファイルを作り、次のコードを追加する。
import axios from "axios";

const getAll = () => {
  return axios.get("/api/todos/");
};

const get = id => {
  return axios.get(`/api/todos/${id}`);
};

const create = data => {
  return axios.post("/api/todos", data);
};

const update = (id, data) => {
  return axios.put(`/api/todos/${id}`, data);
};

const remove = id => {
  return axios.delete(`/api/todos/${id}`);
};

const removeAll = () => {
  return axios.delete(`/api/todos`);
};

export default {
  getAll,
  get,
  create,
  update,
  remove,
  removeAll
};
Finally, to complete this step, update reactfrontend/App.js to the following to call the services.
最後に、サービスを呼び出すように、reactfrontend/App.jsを次の内容へ更新して、この手順を完了する。
handleSubmit = (item) => {
  var data = {
    id: item.id,
    title: item.title,
    content: item.content,
    due_date: item.due_date,
    category: item.category
  };

  TodoService.create(data)
    .then((res) => this.refreshList())
    .catch((err) => console.log(err));
};
handleUpdate = (item) => {
  var data = {
    id: item.id,
    title: item.title,
    content: item.content,
    due_date: item.due_date,
    category: item.category
  };
  TodoService.update(item.id, data)
    .then((res) => this.refreshList())
    .catch((err) => console.log(err));
};
handleDelete = (item) => {
  TodoService.remove(item.id)
    .then((res) => this.refreshList())
    .catch((err) => console.log(err));
};
refreshList = () => {
  TodoService.getAll()
  .then((res) => this.setState({ todoList: res.data }))
  .catch((err) => console.log(err));
}
Once this is completed, run both the Express web server and the React app using the following commands:
完了したら、次のコマンドを使い、Express WebサーバーとReactアプリの両方を実行する。
$ node server.js
$ npm start
When this is done, use the form shown in Figure 11.34 to create a new todo item.
実行したら、図11.34のフォームを使って、新しいtodo項目を作成する。
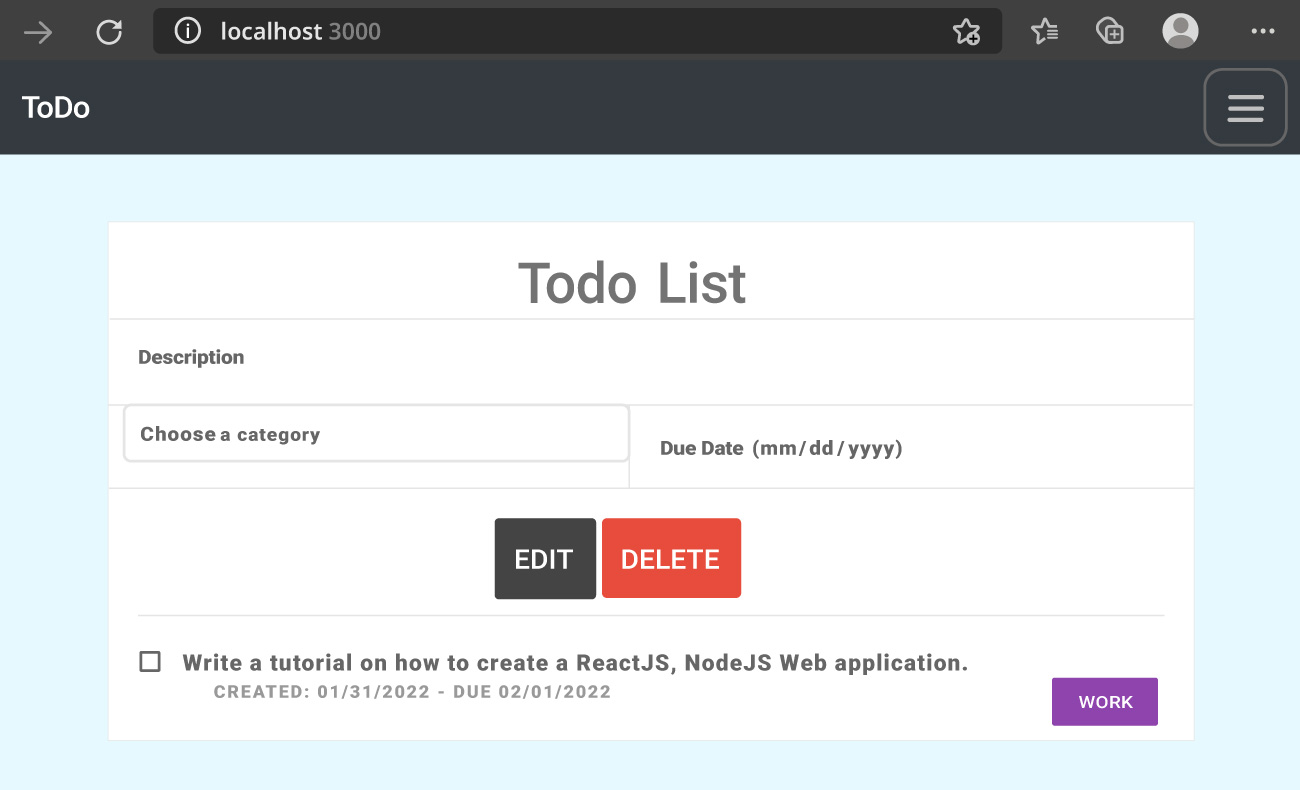
rendered using Bootstrap, under MIT license copyrighted 2018 Twitter, with React by Meta Open Source and Node; attribution: Copyright Rice University, OpenStax, under CC BY 4.0 license · MIT as stated in caption / CC BY 4.0 · Source出典
Figure 11.34 Once the Todo web application is created using Bootstrap with React and Node, this form can be used to create todo items. (rendered using Bootstrap, under MIT license copyrighted 2018 Twitter, with React by Meta Open Source and Node; attribution: Copyright Rice University, OpenStax, under CC BY 4.0 license)
図11.34 Bootstrap、React、NodeでTodo Webアプリケーションを作成すると、このフォームでtodo項目を作れる。(2018 Twitter著作権・MITライセンスのBootstrap、Meta Open SourceのReact、およびNodeを使って表示。出典:Copyright Rice University, OpenStax、CC BY 4.0ライセンス)