第11章Webアプリケーション開発
11.4 Sample Responsive WAD with Bootstrap/React and Django11.4 Bootstrap/ReactとDjangoによるレスポンシブWebアプリケーション開発の例
Learning Objectives学習目標
By the end of this section, you will be able to:
この節を終えると、次のことができるようになる。
• Update the Todo web application with Bootstrap, React, and Django
• Bootstrap、React、Djangoを使ってTodo Webアプリケーションを更新する。
• Extend the Django back end to support the React front end
• Reactのフロントエンドを支えるよう、Djangoのバックエンドを拡張する。
• Connect the React front end to the Django back end
• ReactのフロントエンドをDjangoのバックエンドへ接続する。
Previously, you learned how to build a Todo web application using Bootstrap and Django and then using Bootstrap with React and Node. This section will review the steps required to update the Todo web application using Bootstrap with React and Django.
これまでに、BootstrapとDjangoを使う方法と、Bootstrap・React・Nodeを使う方法で、Todo Webアプリケーションの構築を学んだ。この節では、Bootstrap・React・Djangoを使ってTodo Webアプリケーションを更新するために必要な手順を確認する。
Updating the Todo Web Application with Bootstrap, React, and DjangoBootstrap・React・DjangoによるTodo Webアプリケーションの更新
In this section, the Todo web application implemented will build on the Django application covered in 11.2 Sample Responsive WAD with Bootstrap and Django, as well as the React application explored in 11.3 Sample Responsive WAD with Bootstrap/React and Node. For this version of the Todo web application, React serves as the front end handling the user interface to get and set data via HTTP requests. Django serves as the back end.
英語のヒント
この節で実装するTodo Webアプリケーションは、11.2「BootstrapとDjangoによるレスポンシブWebアプリケーション開発の例」で扱ったDjangoアプリケーションと、11.3「Bootstrap/ReactとNodeによるレスポンシブWebアプリケーション開発の例」で扱ったReactアプリケーションを基にする。この版のTodo Webアプリケーションでは、Reactがフロントエンドとして、HTTPリクエストを通じてデータを取得・設定する利用者インターフェースを扱う。Djangoはバックエンドを担う。
Prerequisites前提条件
To build this version of the Todo application, you need Python v3.9.4, PIP v21.3.1, Django v4.0.1, Django REST Framework v3.13.1, Bootstrap v4.5.0, Django-cors-headers v3.11.0, React v17.0.2, and Axios v0.21.0. To begin, complete the following steps:
この版のTodoアプリケーションを作るには、Python v3.9.4、PIP v21.3.1、Django v4.0.1、Django REST Framework v3.13.1、Bootstrap v4.5.0、Django-cors-headers v3.11.0、React v17.0.2、Axios v0.21.0が必要である。まず、次の手順を行う。
• Activate the venv used in section 11A.2:
• 11A.2節で使ったvenvを有効にする。
$ cd py394venvWindows:
$ source ./Scripts/activate macOS: $ source ./bin/activateWindows:$ source ./Scripts/activatemacOS:$ source ./bin/activate
• Install in the local programming environment Django Cors Headers
• ローカルのプログラミング環境へDjango Cors Headersをインストールする。
$ pip install django-cors-headers==3.11.0 ]LINK TO LEARNING学びを広げるリンク
When using Django, Cross-Origin Resource Sharing (CORS) headers (https://openstax.org/r/ 76CORSheaders) can be a valuable tool to allow a Django application to accept in-browser requests that come from other origins. With CORS headers, other domains can access your resources, but only if permitted. When used appropriately, this makes CORS an important tool to boost a website’s security.
英語のヒント
Djangoを使う際、Cross-Origin Resource Sharing(CORS)headers(https://openstax.org/r/76CORSheaders)は、別のオリジンから来るブラウザー内の要求をDjangoアプリケーションが受け入れられるようにする、有用なツールとなる。CORSヘッダーを使うと、ほかのドメインがリソースにアクセスできるようになるが、それは許可されている場合に限られる。適切に使えば、このためCORSは、Webサイトのセキュリティを高める重要なツールとなる。
Extending the Django Back End to Support the React Front EndReactのフロントエンドを支えるためのDjangoバックエンドの拡張
To create a Todo web application using React as a front end to the Django back end, the Django project requires a couple of configurations. Open TodoApp/settings.py and add ‘corsheaders’ to INSTALLED_APPS as in the following code.
Djangoのバックエンドに対するフロントエンドとしてReactを使い、Todo Webアプリケーションを作るには、Djangoプロジェクトにいくつか設定が必要である。TodoApp/settings.pyを開き、次のコードのように、INSTALLED_APPSへ‘corsheaders’を追加する。
INSTALLED _APPS = [
    'django.contrib.admin',
    'django.contrib.auth',
    'django.contrib.contenttypes',
    'django.contrib.sessions',
    'django.contrib.messages',
    'django.contrib.staticfiles',
    'corsheaders',
    'rest_framework',
    'todo',
]
By configuring the Django project with CORS, the Django application will be allowed to accept in-browser requests that come from other origins. To add CORS, add the CORS middleware to MIDDLEWARE, as shown in the following code.
DjangoプロジェクトにCORSを設定すると、Djangoアプリケーションは、別のオリジンから送られるブラウザー内の要求を受け入れられるようになる。CORSを追加するには、次のコードのように、MIDDLEWAREへCORSミドルウェアを追加する。
MIDDLEWARE = [
    'django.middleware.security.SecurityMiddleware',
    'django.contrib.sessions.middleware.SessionMiddleware',
    'django.middleware.common.CommonMiddleware',
    'django.middleware.csrf.CsrfViewMiddleware',
    'django.contrib.auth.middleware.AuthenticationMiddleware',
    'django.contrib.messages.middleware.MessageMiddleware',
    'django.middleware.clickjacking.XFrameOptionsMiddleware',
    'corsheaders.middleware.CorsMiddleware',
]
After completing this step, scroll to the bottom of the settings.py file and add the following variable.
この手順を完了したら、settings.pyファイルの末尾までスクロールし、次の変数を追加する。
# add CORS whitelist for localhost:3000 since the React frontend will be served on port 3000
CORS_ORIGIN_WHITELIST = [
    'http://localhost:3000'
]
LINK TO LEARNING学びを広げるリンク
Axios is an HTTP client for Node that manages asynchronous HTTP requests. Axios is free and open-source, with built-in security measures. Axios uses clean, efficient syntax to manage promises, and works well with Node, as well as browser environments. Visit this page on Axios (https://openstax.org/r/76Axios) to learn more.
英語のヒント
Axiosは、非同期のHTTPリクエストを管理する、Node用のHTTPクライアントである。無料で、オープンソースであり、セキュリティ対策が組み込まれている。明快で効率的な構文によってPromiseを管理し、Nodeでもブラウザー環境でも適切に動作する。詳しくは、Axiosのこのページ(https://openstax.org/r/76Axios)を参照。
Connecting the React Front End to the Django Back EndReactのフロントエンドとDjangoのバックエンドの接続
Next, the React application must be configured so it can make requests to the API endpoints of the Django application. The React application uses Axios to fetch data by making requests to a given endpoint. To install Axios, run the following command in the reactfrontend/ directory:
英語のヒント
次に、DjangoアプリケーションのAPIエンドポイントへ要求を送れるように、Reactアプリケーションを設定する必要がある。ReactアプリケーションはAxiosを使い、指定されたエンドポイントへ要求を送って、データを取得する。Axiosをインストールするには、reactfrontend/ディレクトリで次のコマンドを実行する。
$ npm install axios@0.21.1Next, add a proxy to the Django application. The proxy will help tunnel API requests from the React application to http://localhost:8000, where the Django application will receive and handle the requests. To add the proxy, open the reactfrontend/package.json file and add the following code.
次に、Djangoアプリケーションへのプロキシを追加する。プロキシは、ReactアプリケーションからのAPIリクエストをhttp://localhost:8000へ通し、そこでDjangoアプリケーションが要求を受信して処理できるようにする。追加するには、reactfrontend/package.jsonファイルを開き、次のコードを追加する。
{
  "name": "reactfrontend",
  "version": "0.1.0",
  "private": true,
  "proxy": "http://localhost:8080",
  "dependencies": {
After completing this step, open the reactfrontend/src/App.js file and import Axios, as shown in the following code.
この手順を完了したら、reactfrontend/src/App.jsファイルを開き、次のコードのようにAxiosをインポートする。
import './App.css';
import React, { Component } from "react";
import Modal from "./components/Modal";
import Nav from "./components/NavComponent";
import axios from "axios";
import { Button, Form, FormGroup, Label, Input } from 'reactstrap';
To update the reactfrontend/src/App.js file, add the following code. The
handleSubmit() function will use Axios to make requests to the Django API endpoints to create and delete todo items.reactfrontend/src/App.jsファイルを更新するため、次のコードを追加する。handleSubmit()関数は、AxiosでDjangoのAPIエンドポイントへ要求を送り、todo項目を作成・削除する。
handleSubmit = (item) => {
  this.toggle();
  if (item.id) {
    axios
      .put(`/api/todos/${item.id}/`, item)
      .then((res) => this.refreshList());
    return;
  }
  axios
    .post("/api/todos/", item)
    .then((res) => this.refreshList());
};

handleDelete = (item) => {
  axios
    .delete(`/api/todos/${item.id}/`)
    .then((res) => this.refreshList());
};
When these steps are complete, start up the Django server and then start up the React application, using the following commands, respectively.
英語のヒント
これらの手順が完了したら、次のコマンドをそれぞれ使い、Djangoサーバーを起動してからReactアプリケーションを起動する。
$ python manage.py runserver
$ npm start
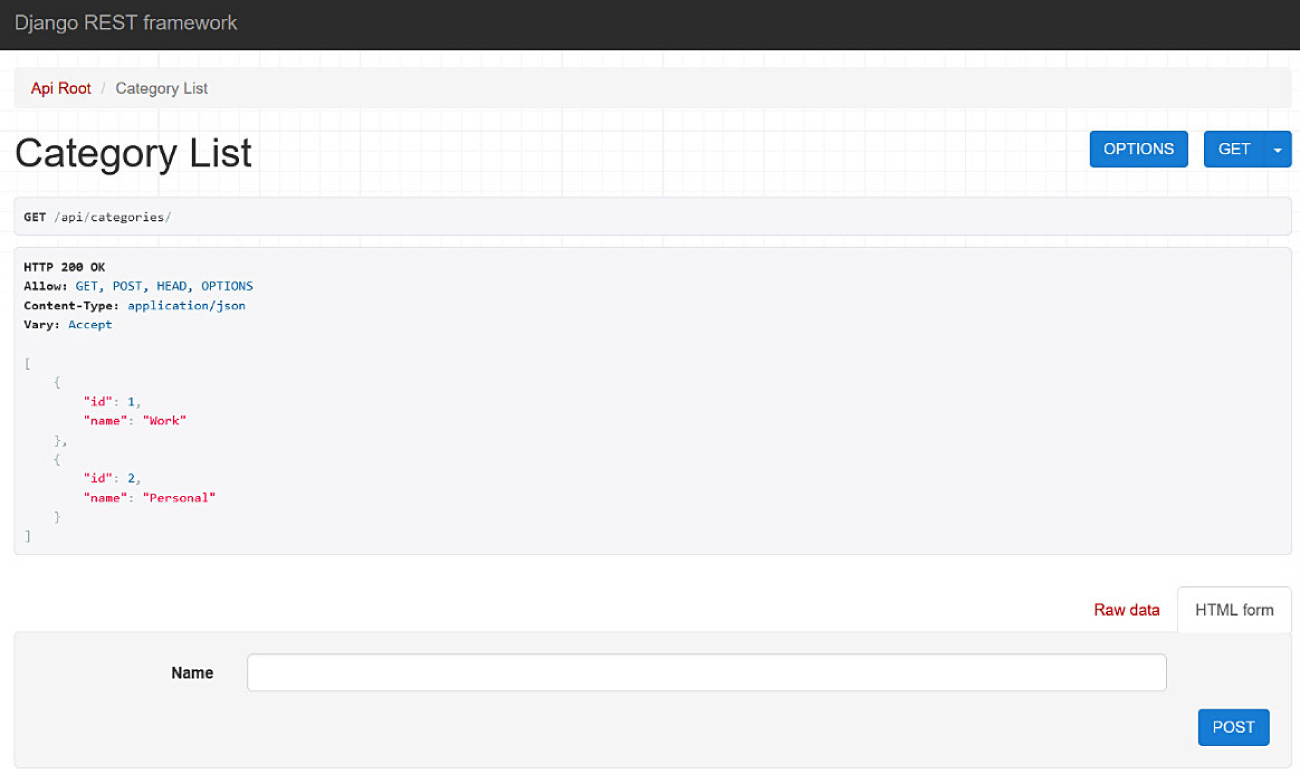
To access the Django REST API, navigate to http://localhost:8000/api/. This is similar to the steps completed in 11.2 Sample Responsive WAD with Bootstrap and Django. Click on the categories API path to enter two categories, as seen in Figure 11.35.
Django REST APIへアクセスするには、http://localhost:8000/api/へ移動する。これは、11.2「BootstrapとDjangoによるレスポンシブWebアプリケーション開発の例」で行った手順と似ている。categoriesのAPIパスをクリックし、図11.35のように、2つのカテゴリーを入力する。
rendered in React by Meta Open Source; attribution: Copyright Rice University, OpenStax, under CC BY 4.0 license · CC BY 4.0 · Source出典
Figure 11.35 After navigating to http://localhost:8000/api/ and following the instructions provided, this page will appear to allow access to the Django REST API. (rendered in React by Meta Open Source; attribution: Copyright Rice University, OpenStax, under CC BY 4.0 license)
図11.35 http://localhost:8000/api/へ移動して手順に従うと、このページが表示され、Django REST APIへアクセスできる。(Meta Open SourceのReactで表示。出典:Copyright Rice University, OpenStax、CC BY 4.0ライセンス)
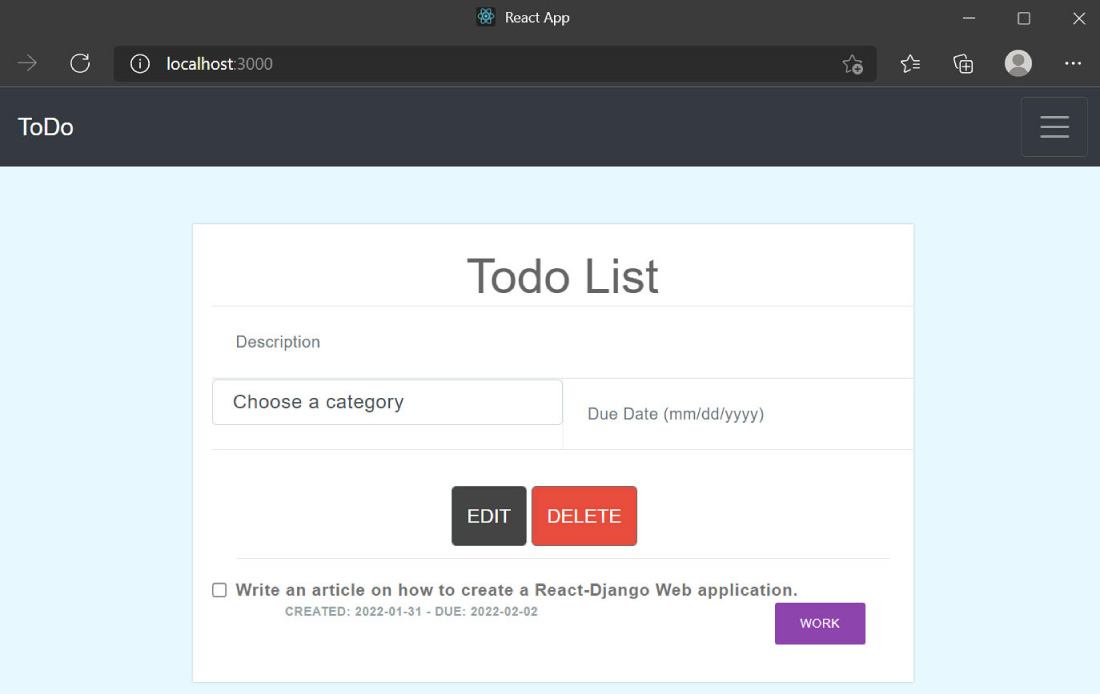
When the React application starts up, a browser page will automatically launch for navigating to http://localhost:3000 and the user interface should render. Figure 11.36 shows the page on which to create a todo item.
Reactアプリケーションが起動すると、ブラウザーが自動的にhttp://localhost:3000を開き、利用者インターフェースが描画されるはずである。図11.36は、todo項目を作成するページを示している。
rendered in React by Meta Open Source; attribution: Copyright Rice University, OpenStax, under CC BY 4.0 license · CC BY 4.0 · Source出典
Figure 11.36 After the React application starts up, this user interface will appear. (rendered in React by Meta Open Source; attribution: Copyright Rice University, OpenStax, under CC BY 4.0 license)
図11.36 Reactアプリケーションを起動すると、この利用者インターフェースが表示される。(Meta Open SourceのReactで表示。出典:Copyright Rice University, OpenStax、CC BY 4.0ライセンス)
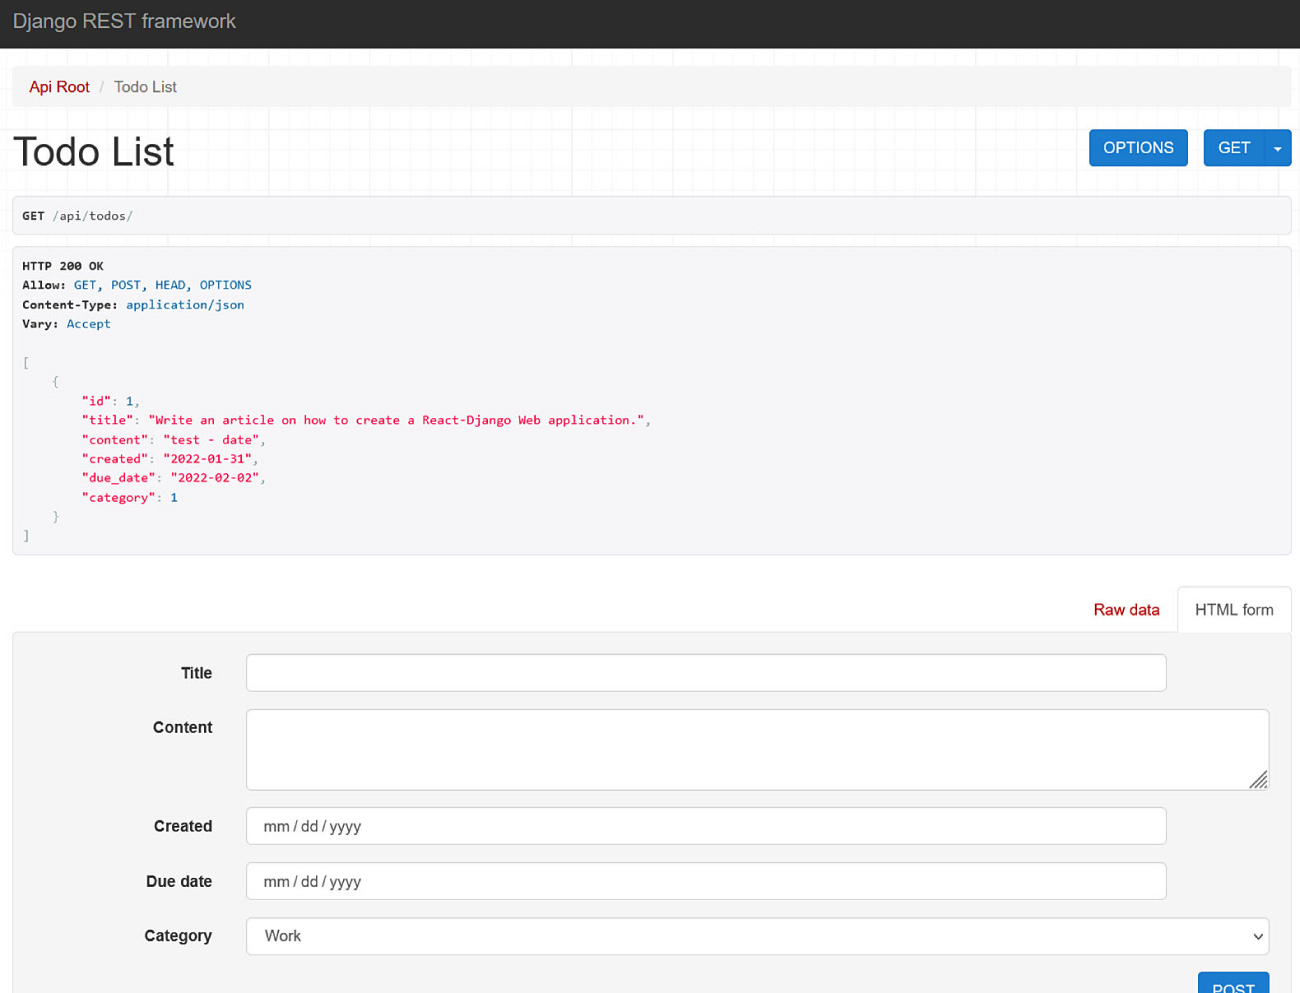
At this point, revisit the Django REST API. Figure 11.37 shows that the todo item should be accessible via the todos API path.
英語のヒント
ここで、Django REST APIをもう一度確認する。図11.37のように、todosのAPIパスからtodo項目へアクセスできるはずである。
rendered using Bootstrap under MIT license copyrighted 2018 Twitter; with Django, a registered trademark of the Django Software Foundation; and React by Meta Open Source; attribution: Copyright Rice University, OpenStax, under CC BY 4.0 license · MIT as stated in caption / CC BY 4.0 · Source出典
Figure 11.37 Once the Todo web application is updated using Bootstrap with Django and React, this page should appear to allow users to create a Todo List. (rendered using Bootstrap under MIT license copyrighted 2018 Twitter; with Django, a registered trademark of the Django Software Foundation; and React by Meta Open Source; attribution: Copyright Rice University, OpenStax, under CC BY 4.0 license)
図11.37 Bootstrap・Django・Reactを使ってTodo Webアプリケーションを更新すると、このページが表示され、利用者がTodo Listを作成できるはずである。(2018 Twitter著作権・MITライセンスのBootstrap、Django Software Foundationの登録商標であるDjango、およびMeta Open SourceのReactを使って表示。出典:Copyright Rice University, OpenStax、CC BY 4.0ライセンス)