第11章Webアプリケーション開発
Creating the User Interface利用者インターフェースの作成
To use and control the Todo application, you must create a user interface (UI). This section will outline the steps to do this.
Todoアプリケーションを利用し、操作するには、利用者インターフェース(UI)を作成する必要がある。この項では、その手順の概要を示す。
Installing BootstrapBootstrapのインストール
The first step to create a UI is to install Bootstrap, which, as an open-source, responsive web application framework, can be used in web applications like Django to create UIs. To install Bootstrap in a Django application, you have several options. In this scenario, an efficient method is to download the Bootstrap CSS and JS files and add them to the static/ directory, as shown in Figure 11.26. To do this, first create the static/ directory in the Django project directory. In addition, to install jQuery, download the JS file and add it to the static/ directory. Finally, add a custom CSS file to include individual style in the Django web application.
英語のヒント
UIを作る最初の手順は、Bootstrapのインストールである。Bootstrapは、オープンソースのレスポンシブWebアプリケーションフレームワークとして、DjangoのようなWebアプリケーションでUIの作成に使える。DjangoアプリケーションへBootstrapをインストールするには、いくつかの方法がある。ここで効率的な方法は、図11.26のように、BootstrapのCSSファイルとJSファイルをダウンロードして、static/ディレクトリへ追加することである。まずDjangoプロジェクトのディレクトリ内にstatic/ディレクトリを作成する。さらに、jQueryをインストールするため、JSファイルをダウンロードしてstatic/へ追加する。最後に、DjangoのWebアプリケーションに独自のスタイルを加えるため、カスタムCSSファイルを追加する。
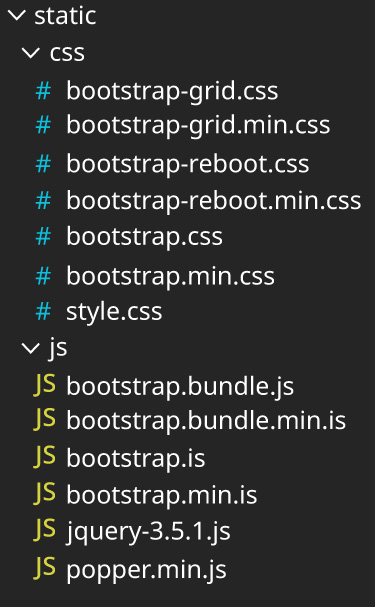
rendered in Django, a registered trademark of the Django Software Foundation; attribution: Copyright Rice University, OpenStax, under CC BY 4.0 license · CC BY 4.0 · Source出典
Figure 11.26 An efficient method to install Bootstrap in a Django application is to download the Bootstrap CSS and JS files and add them to the static/ directory. (rendered in Django, a registered trademark of the Django Software Foundation; attribution: Copyright Rice University, OpenStax, under CC BY 4.0 license)
図11.26 DjangoアプリケーションにBootstrapをインストールする効率的な方法は、BootstrapのCSSファイルとJSファイルをダウンロードし、static/ディレクトリへ追加することである。(Djangoで表示。DjangoはDjango Software Foundationの登録商標。出典:Copyright Rice University, OpenStax、CC BY 4.0ライセンス)
After adding the CSS and JS files to the static/ directory, the next step is to open the ToDoApp/settings.py file, navigate to the bottom of the file, and add the path variables shown in the following code snippet.
CSSファイルとJSファイルをstatic/ディレクトリに追加したら、次にToDoApp/settings.pyファイルを開く。ファイルの末尾へ移動し、次のコード例のパス変数を追加する。
# Static files (CSS, JavaScript, Images)
# https://docs.djangoproject.com/en/4.0/howto/static-files/

STATIC_URL = 'static/'

PROJECT_ROOT = os.path.dirname(os.path.abspath(__file__))
STATIC_ROOT = os.path.join(PROJECT_ROOT, 'static')
Creating the ViewViewの作成
The next step is to create the View. The View function is needed for template pages, which are created in the next section. The View function is also needed to interact with the database to both create and delete todo items.
次にViewを作成する。View関数は、次の項で作るテンプレートページに必要である。また、データベースとやり取りし、todo項目の作成と削除の両方を行うためにも必要になる。
To create the View, open the todo/views.py file and add the code shown in the following code snippet. This code takes an HTTP request object. If the request method is POST, a todo item is either created or deleted, depending on which button is clicked. Otherwise, the request method is GET and the todo items are displayed to the user.
英語のヒント
Viewを作成するには、todo/views.pyファイルを開き、次のコード例を追加する。このコードは、HTTPリクエストのオブジェクトを受け取る。リクエストのメソッドがPOSTなら、クリックされたボタンに応じて、todo項目を作成するか削除する。それ以外では、リクエストのメソッドはGETであり、todo項目を利用者へ表示する。
def index(request): # index view
  todos = TodoList.objects.all() # query all todos with object manager
  categories = Category.objects.all() # get all categories with object manager
  if request.method == "POST": # check if request method is POST
    if "taskAdd" in request.POST: # check if request is to add a todo item
      title = request.POST["description"] # title
      date = str(request.POST["date"]) # date
      category = request.POST["category_select"] # category
      content = title + " -- " + date + " " + category # content
      Todo = TodoList(title=title, content=content, due_date=date,
category=Category.objects.get(name=category))
      Todo.save() # save todo item
      return redirect("/") # reload page
    if "taskDelete" in request.POST: # check if request is to delete a todo
      checkedlist = request.POST["checkedbox"] # checked todos to be deleted
      for todo_id in checkedlist:
        todo = TodoList.objects.get(id=int(todo_id)) # get todo id
        todo.delete() # delete todo
  return render(request, "index.html", {"todos": todos, "categories":categories})
Creating the Templatesテンプレートの作成
The final step to build a Django web application is to create templates, which are HTML files that can also contain embedded Python code. Create a file called style.css under the /static/css directory and insert the code shown here into that file. The templates discussed in the following sections require this style sheet.
英語のヒント
Django Webアプリケーションを作る最後の手順は、テンプレートの作成である。テンプレートは、Pythonのコードを埋め込むこともできるHTMLファイルである。/static/cssディレクトリの下にstyle.cssというファイルを作り、次のコードを挿入する。以降で扱うテンプレートは、このスタイルシートを必要とする。
/* basic reset */
*,
*:before,
*:after {
  -webkit-box-sizing: border-box;
  -moz-box-sizing: border-box;
  box-sizing: border-box;
}

/* app */
html {
  font-size: 100%;
}

body {
  background: #e6f9ff;
  font-family: "Open Sans", sans-serif;
}
/* super basic grid structure */
.container {
  width: 600px;
  margin: 0 auto;
  background: #ffffff;
  padding: 20px 0;
  -webkit-box-shadow: 0 0 2px rgba(0, 0, 0, 0.2);
  box-shadow: 0 0 2px rgba(0, 0, 0, 0.2);
}

.row {
  display: block;
  padding: 10px;
  text-align: center;
  width: 100%;
  clear: both;
  overflow: hidden;
}

.half {
  width: 50%;
  float: left;
}

.content {
  background: #fff;
}

/* logo */
h1 {
  font-family: "Rokkitt", sans-serif;
  color: #666;
  text-align: center;
  font-weight: 400;
  margin: 0;
}

.tagline {
  margin-top: -10px;
  text-align: center;
  padding: 5px 20px;
  font-size: 11px;
  font-weight: 600;
  text-transform: uppercase;
  color: #777;
}

/* inputs */
.inputContainer {
  height: 60px;
  border-top: 1px solid #e5e5e5;
  position: relative;
  overflow: hidden;
}

.inputContainer.last {
  border-bottom: 1px solid #e5e5e5;
  margin-bottom: 20px;
}

.inputContainer.half.last.right {
  border-left: 1px solid #efefef;
}

input[type="date"],
input[type="text"],
select {
  height: 100%;
  width: 100%;
  padding: 0 20px;
  position: absolute;
  top: 0;
  vertical-align: middle;
  display: inline-block;
  border: none;
  border-radius: none;
  font-size: 13px;
  color: #777;
  margin: 0;
  font-family: "Open Sans", sans-serif;
  font-weight: 600;
  letter-spacing: 0.5px;
  -webkit-transition: background 0.3s;
  transition: background 0.3s;
}

input[type="date"] {
  cursor: pointer;
}

input[type="date"]:focus,
input[type="text"]:focus,
select:focus {
  outline: none;
  background: #ecf0f1;
}

::-webkit-input-placeholder {
  color: lightgrey;
  font-weight: normal;
  -webkit-transition: all 0.3s;
  transition: all 0.3s;
}
::-moz-placeholder {
  color: lightgrey;
  font-weight: normal;
  transition: all 0.3s;
}
::-ms-input-placeholder {
  color: lightgrey;
  font-weight: normal;
  transition: all 0.3s;
}
input:-moz-placeholder {
  color: lightgrey;
  font-weight: normal;
  transition: all 0.3s;
}

input:focus::-webkit-input-placeholder {
  color: #95a5a6;
  font-weight: bold;
}

input:focus::-moz-input-placeholder {
  color: #95a5a6;
  font-weight: bold;
}

.inputContainer label {
  padding: 5px 20px;
  font-size: 11px;
  font-weight: 600;
  text-transform: uppercase;
  color: #777;
  display: block;
  position: absolute;
}

button {
  font-family: "Open Sans", sans-serif;
  background: transparent;
  border-radius: 2px;
  border: none;
  outline: none;
  height: 50px;
  font-size: 14px;
  color: #fff;
  cursor: pointer;
  text-transform: uppercase;
  position: relative;
  -webkit-transition: all 0.3s;
  transition: all 0.3s;
  padding-left: 30px;
  padding-right: 15px;
}

.icon {
  position: absolute;
  top: 30%;
  left: 10px;
  font-size: 20px;
}

.taskAdd {
  background: #444;
  padding-left: 31px;
}

.taskAdd:hover {
  background: #303030;
}

.taskDelete {
  background: #e74c3c;
  padding-left: 30px;
}

.taskDelete:hover {
  background: #c0392b;
}

/* task styles */
.taskList {
  list-style: none;
  padding: 0 20px;
}

.taskItem {
  border-top: 1px solid #e5e5e5;
  padding: 15px 0;
  color: #777;
  font-weight: 600;
  font-size: 14px;
  letter-spacing: 0.5px;
}

.taskList .taskItem:nth-child(even) {
  background: #fcfcfc;
}

.taskCheckbox {
  margin-right: 1em;
}

.complete-true {
  text-decoration: line-through;
  color: #bebebe;
}

.taskList .taskDate {
  color: #95a5a6;
  font-size: 10px;
  font-weight: bold;
  text-transform: uppercase;
  display: block;
  margin-left: 41px;
}

.fa-calendar {
  margin-right: 10px;
  font-size: 16px;
}

[class*="category-"] {
  display: inline-block;
  font-size: 10px;
  background: #444;
  vertical-align: middle;
  color: #fff;
  padding: 10px;
  width: 75px;
  text-align: center;
  border-radius: 2px;
  float: right;
  font-weight: normal;
  text-transform: uppercase;
  margin-right: 20px;
}

.category- {
  background: transparent;
}

.category-Personal {
  background: #2980b9;
}

.category-Work {
  background: #8e44ad;
}

.category-School {
  background: #f39c12;
}

.category-Cleaning {
  background: #16a085;
}

.category-Other {
  background: #d35400;
}

footer {
  text-align: center;
  font-size: 11px;
  font-weight: 600;
  text-transform: uppercase;
  color: #777;
}

footer a {
  color: #f39c12;
}
/* custom checkboxes */
.taskCheckbox {
  -webkit-appearance: none;
  appearance: none;
  -webkit-transition: all 0.3s;
  transition: all 0.3s;
  display: inline-block;
  cursor: pointer;
  width: 19px;
  height: 19px;
  vertical-align: middle;
}

.taskCheckbox:focus {
  outline: none;
}

.taskCheckbox:before,
.taskCheckbox:checked:before {
  font-family: "FontAwesome";
  color: #444;
  font-size: 20px;
  -webkit-transition: all 0.3s;
  transition: all 0.3s;
}

.taskCheckbox:before {
  content: "\f096";
}

.taskCheckbox:checked:before {
  content: "\f14a";
  color: #16a085;
}
/* custom select menu */
.taskCategory {
  -webkit-appearance: none;
  appearance: none;
  cursor: pointer;
  padding-left: 16.5px; /*specific positioning due to difficult behavior of select
element*/
  background: #fff;
}

.selectArrow {
  position: absolute;
  z-index: 10;
  top: 35%;
  right: 0;
  margin-right: 20px;
  color: #777;
  pointer-events: none;
}

.taskCategory option {
  background: #fff;
  border: none;
  outline: none;
  padding: 0 100px;
}
The first template file is base.html, which is the file that includes links to Bootstrap and jQuery. To illustrate these links, a snippet of the base.html file is shown in the code. The Bootstrap navigation bar is implemented in this file.
最初のテンプレートファイルはbase.htmlであり、BootstrapとjQueryへのリンクを含む。これらのリンクを示すため、コードにbase.htmlの一部を示している。このファイルで、Bootstrapのナビゲーションバーを実装する。
<!DOCTYPE html>
<html>
  <head>
    <meta charset="UTF-8" />
    <title>TodoApp - Django</title>
    {% load static %}
    <!-- Bootstrap CSS -->
    <link rel="stylesheet" href="/static/css/bootstrap.min.css" />
    <link
      rel="stylesheet"
      type="text/css"
      href="https://maxcdn.bootstrapcdn.com/font-awesome/4.7.0/css/font-awesome.min.css"
    />
    <link
      rel="stylesheet"
      type="text/css"
      href="{% static 'css/style.css' %}"
    />
    <!-- jQuery -->
    <script
      type="text/javascript"
      src="{% static 'js/jquery-3.5.1.min.js' %}"></script>
    <!-- Popper -->
    <script
      type="text/javascript"
      src="{% static 'js/popper.min.js' %}"></script>
    <!-- Bootstrap Core JavaScript -->
    <script
    type="text/javascript"
    src="{% static 'js/bootstrap.bundle.min.js' %}"></script>
<script
</head>

<body>
  <nav class="navbar navbar-dark bg-dark justify-content-between">
    <a class="navbar-brand">ToDo</a>
    <form class="form-inline">
      <input
        class="form-control mr-sm-2"
        type="search"
        placeholder="Search"
        aria-label="Search"
      />
      <button class="btn btn-outline-info my-2 my-sm-0" type="submit">
        Search
        </button>
      </form>
    </nav>
    <div>{% block content %} {% endblock content %}</div>
  </body>
</html>
The second template file is index.html, which lists any existing todo items and includes the form to create or delete a todo item. A snippet of the index.html file is shown in the following code. The index.html file also extends the base.html template, which allows the Bootstrap navigation bar implemented in base.html to be inserted in this page and every page that extends it.
英語のヒント
2つ目のテンプレートファイルはindex.htmlであり、既存のtodo項目を一覧表示し、todo項目を作成・削除するフォームを含む。次のコードに、index.htmlの一部を示している。index.htmlはbase.htmlテンプレートを拡張するため、base.htmlに実装されたBootstrapのナビゲーションバーを、このページと、base.htmlを拡張するすべてのページへ挿入できる。
{% extends "./base.html" %} {% load static %} {% block content %}
 <div django-app="TaskManager">
  <div class="container mt-5">
   <div class="content">
    <h1>Todo List</h1>
    <!--<p class="tagline">Django Todo App</p>-->
    <form action="" method="post">
     {% csrf_token %}
     <!-- csrf token for basic security -->
     <div class="inputContainer">
       <input         type="text"         id="description"         class="taskName"
        placeholder="What do you need to do?"         name="description"
        required        />
       <label for="description">Description</label>
      </div>
      <div class="inputContainer half last">
       <i class="fa fa-caret-down selectArrow"></emphasis>
       <select id="category" class="taskCategory" name="category_select">
        <option class="disabled" value="">Choose a category</option>
       {% for category in categories %}
       <option         class=""         value="{{ category.name }}"         name="{{ category.name }}"        >
        {{ category.name }}
       </option>
       {% endfor %}
      </select>
      <label for="category">Category</label>
     </div>
     <div class="inputContainer half last right">
      <input type="date" id="dueDate" class="taskDate" name="date" />
      <label for="dueDate">Due Date</label>
     </div>
     <div class="row">
      <button class="taskAdd" name="taskAdd" type="submit">
       <i class="fa fa-plus icon"></emphasis>Add task
      </button>
      <button        class="taskDelete"        name="taskDelete"
       formnovalidate=""        type="submit"
       onclick="$('input#sublist').click();"       >
       <i class="fa fa-trash-o icon"></emphasis>Delete Tasks
      </button>
     </div>
     <ul class="taskList">
      {% for todo in todos %}
      <!-- django template lang - for loop -->
      <li class="taskItem">
        <input          type="checkbox"          class="taskCheckbox"
         name="checkedbox"          id="{{ todo.id }}"          value="{{ todo.id }}"
        />
        <label for="{{ todo.id }}" ><span class="complete-">{{ todo.title
}}</span></label>
        <span class="category-{{ todo.category }}"          >{{ todo.category
}}</span>
         >{{ todo.category }}</span
<strong class="taskDate" ><i class="fa fa-calendar"></emphasis>Created:
{{todo.created}} - Due:
         >{{ todo.category }}</span
{{todo.due_date}}</strong>
        >{{ todo.category }}</span
       </li>
        {% endfor %}
       </ul>
       <!-- taskList -->
      </form>
     </div>
     <!-- content -->
    </div>
  <!-- container -->
</div>
{% endblock %}
The first step to access the Todo Django web application is to restart the Django server using the following command:
TodoのDjango Webアプリケーションへアクセスする最初の手順は、次のコマンドでDjangoサーバーを再起動することである。
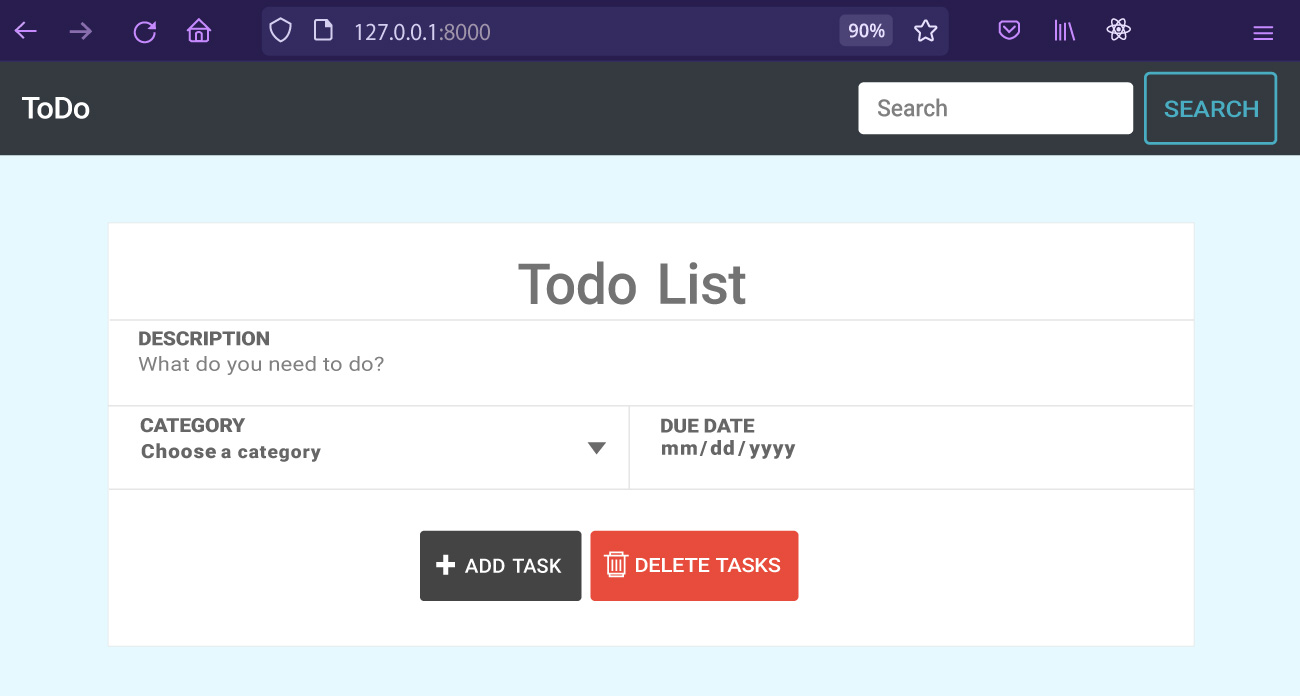
$ python manage.py runserverNext, launch a browser and navigate to http://localhost:8000. The page highlighted in Figure 11.27 should appear.
次に、ブラウザーを起動し、http://localhost:8000へ移動する。図11.27のページが表示されるはずである。
rendered in Django, a registered trademark of the Django Software Foundation; attribution: Copyright Rice University, OpenStax, under CC BY 4.0 license · CC BY 4.0 · Source出典
Figure 11.27 Once the Django server is restarted, this page should appear at http://localhost:8000. (rendered in Django, a registered trademark of the Django Software Foundation; attribution: Copyright Rice University, OpenStax, under CC BY 4.0 license)
図11.27 Djangoサーバーを再起動すると、http://localhost:8000にこのページが表示されるはずである。(Djangoで表示。DjangoはDjango Software Foundationの登録商標。出典:Copyright Rice University, OpenStax、CC BY 4.0ライセンス)
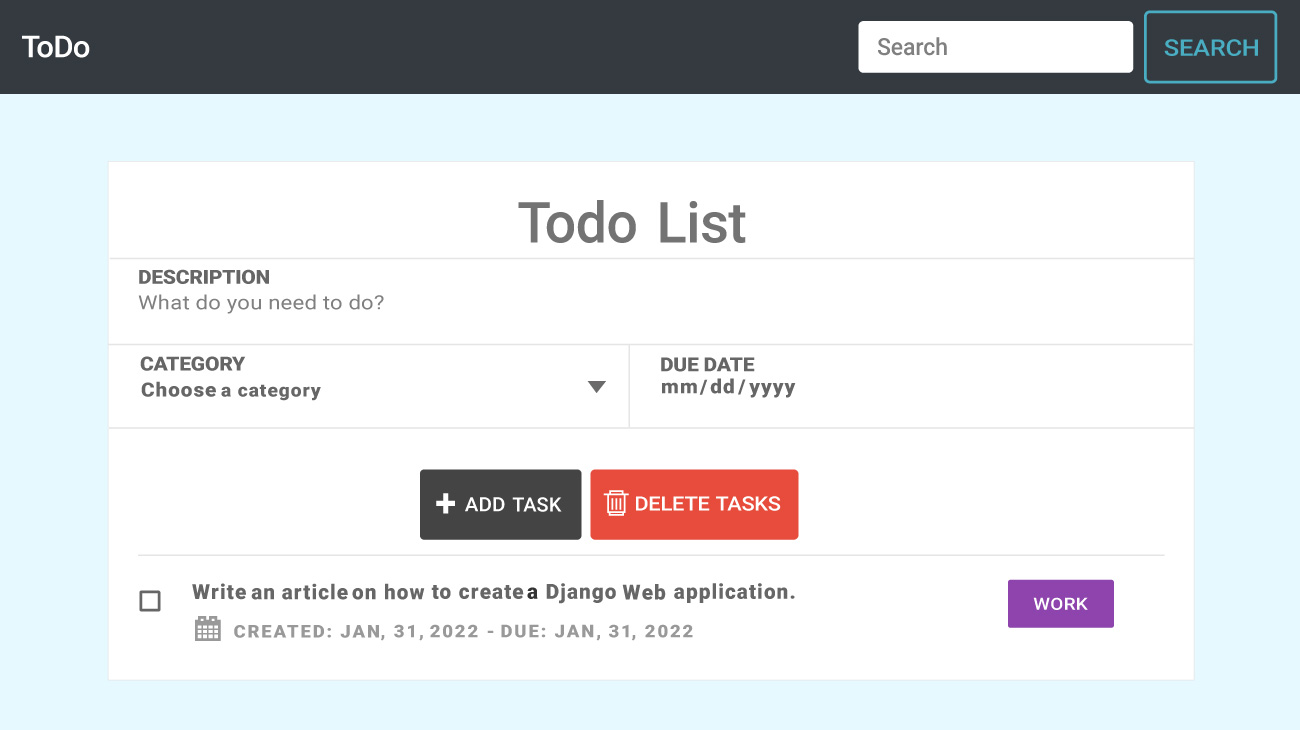
To create a todo list, fill out the form and click the Add Task button as shown in Figure 11.28.
todoリストを作るには、図11.28のようにフォームへ入力し、Add Taskボタンをクリックする。
rendered in Django, a registered trademark of the Django Software Foundation; attribution: Copyright Rice University, OpenStax, under CC BY 4.0 license · CC BY 4.0 · Source出典
Figure 11.28 This figure shows how the Todo List should appear after using the Add Task button to create a todo list. (rendered in Django, a registered trademark of the Django Software Foundation; attribution: Copyright Rice University, OpenStax, under CC BY 4.0 license)
図11.28 Add Taskボタンを使ってtodoリストを作成した後の、Todo Listの表示例。(Djangoで表示。DjangoはDjango Software Foundationの登録商標。出典:Copyright Rice University, OpenStax、CC BY 4.0ライセンス)
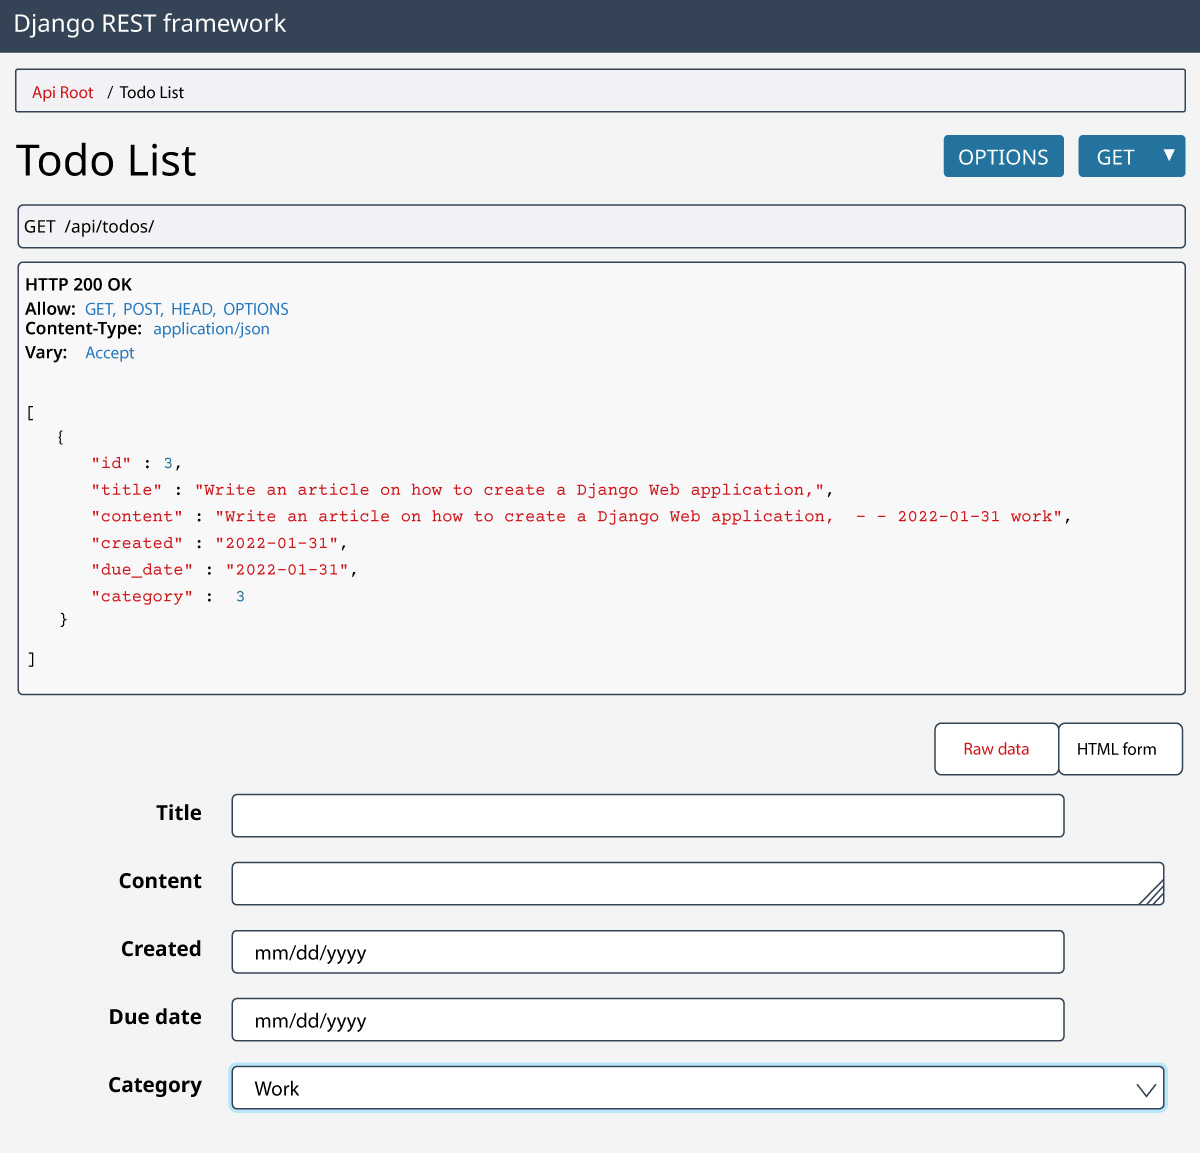
In addition, the todo item should also be viewable in the API that was created. This should appear as outlined in Figure 11.29.
また、作成したAPIでもtodo項目を閲覧できるはずである。図11.29のように表示される。
rendered in Django, a registered trademark of the Django Software Foundation; attribution: Copyright Rice University, OpenStax, under CC BY 4.0 license · CC BY 4.0 · Source出典
Figure 11.29 Once the todo item is created, it should be viewable in the API. (rendered in Django, a registered trademark of the Django Software Foundation; attribution: Copyright Rice University, OpenStax, under CC BY 4.0 license)
図11.29 todo項目を作成すると、APIでも閲覧できるはずである。(Djangoで表示。DjangoはDjango Software Foundationの登録商標。出典:Copyright Rice University, OpenStax、CC BY 4.0ライセンス)