第12章クラウドネイティブアプリケーション開発
12.3 Example PaaS and FaaS Deployments of Cloud-Native Applications12.3 クラウドネイティブアプリケーションをPaaSとFaaSで配置する例
Learning Objectives学習目標
By the end of this section, you will be able to:
この節を終えると、次のことができるようになる。
• Understand how to deploy a cloud-native application on a PaaS platform
• クラウドネイティブアプリケーションをPaaSプラットフォームへ配置する方法を理解する
• Understand how to deploy a cloud-native application using VMWare Tanzu
• VMWare Tanzuを使ってクラウドネイティブアプリケーションを配置する方法を理解する
• Understand how to deploy FaaS functions on a serverless platform
• サーバーレスプラットフォームへFaaS関数を配置する方法を理解する
This module focuses on building sample applications that illustrate the steps taken to deploy sample applications using various cloud deployment technologies. The first section focuses on how to build a sample cloud-native application on a PaaS platform. The sample application provided illustrates the use of microservices, Docker containers, and Kubernetes orchestration. The second section focuses on how to set up a suite of products that are used to manage Kubernetes clusters and monitor applications that are deployed in Kubernetes clusters. Finally, the third section focuses on how to deploy FaaS functions that are parts of a distributed application on a serverless platform. The example provided illustrates the use of various metrics and performance dashboards used to monitor a distributed application. When working through these examples, keep in mind that they are based off tutorials that are made available by the cloud service providers. As the technologies used in these tutorials evolve, the tutorials may change. As a result, there may be differences in the configuration options in the cloud service provider consoles or some of the steps may have changed. Regardless, the underlying goals of these examples should remain achievable. These examples also require subscriptions to AWS and Microsoft Azure. All cloud services providers provide free-trial credits. These examples were completed without exceeding the free-trial credit and using as many free-tier services as possible.
英語のヒント
この節では、さまざまなクラウド配置技術を使う配置手順を示す、サンプルアプリケーションの構築を扱う。最初に、PaaSプラットフォーム上でサンプルのクラウドネイティブアプリケーションを構築する方法を扱う。マイクロサービス、Dockerコンテナー、Kubernetesによるオーケストレーションの利用を示す例である。次に、Kubernetesクラスターを管理し、そこに配置したアプリケーションを監視するための、製品群の設定方法を扱う。最後に、分散アプリケーションの一部であるFaaS関数を、サーバーレスプラットフォームへ配置する方法を扱う。この例では、分散アプリケーションを監視するための、さまざまな指標と性能ダッシュボードを使う。これらの例に取り組むときは、クラウドサービス事業者が公開するチュートリアルに基づいていることを念頭に置こう。そこで使われる技術が進化すると、チュートリアルも変わる可能性がある。その結果、事業者のコンソールの設定項目や、一部の手順が異なる場合がある。それでも、各例の根本的な目標は達成できるはずである。これらの例には、AWSとMicrosoft Azureのサブスクリプションも必要である。すべてのクラウドサービス事業者は、無料試用のクレジットを提供する。本書の例は、できるだけ多くの無料枠のサービスを使い、無料試用のクレジットを超えずに実施した。
PaaS Deployment of a Sample Cloud-Native ApplicationサンプルのクラウドネイティブアプリケーションをPaaSへ配置する
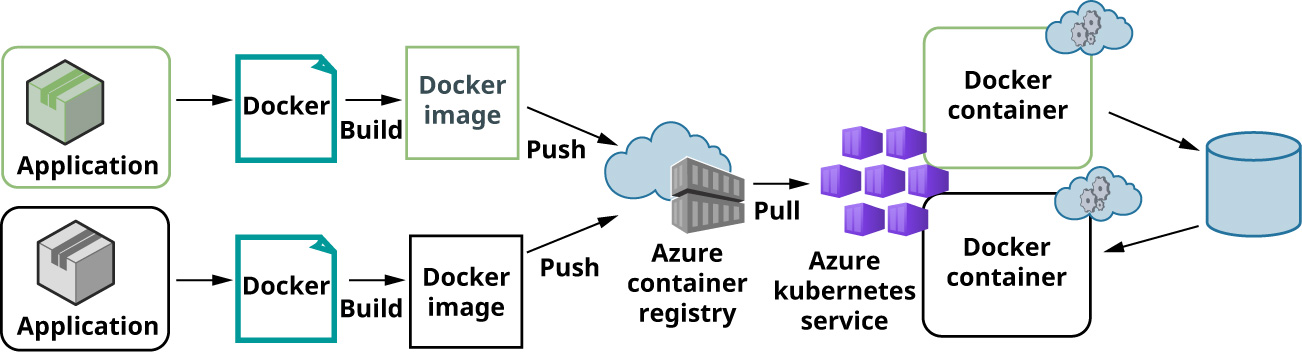
The example in this section illustrates PaaS deployment of a cloud-native application on Microsoft Azure. A subsidiary of Microsoft, Azure is a cloud computing platform that offers a wide range of services that allow customers to build, deploy, and manage applications and services in the cloud. The sample cloud-native application13 includes two microservices. Both communicate with a single datastore. Each microservice is containerized and deployed in a Kubernetes environment illustrating Kubernetes orchestration. The PaaS deployment of this sample cloud-native application in Azure is illustrated in Figure 12.36.
英語のヒント
この節の例は、Microsoft Azure上で、クラウドネイティブアプリケーションをPaaSによって配置する方法を示す。Microsoftの子会社であるAzureは、クラウド上のアプリケーションやサービスを、顧客が構築、配置、管理できる、幅広いサービスを提供するクラウドコンピューティングのプラットフォームである。サンプルのクラウドネイティブアプリケーション13には、2つのマイクロサービスがある。どちらも、単一のデータストアと通信する。それぞれをコンテナー化し、Kubernetes環境へ配置することで、Kubernetesのオーケストレーションを示す。図12.36は、このサンプルをAzureのPaaSへ配置する構成を示している。
13 Sample based off tutorials: https://learn.microsoft.com/en-us/training/modules/cloud-native-build-basic-service/ and https://learn.microsoft.com/en-us/training/modules/cloud-native-apps-orchestrate-containers/
13 次のチュートリアルを基にした例:https://learn.microsoft.com/en-us/training/modules/cloud-native-build-basic-service/ および https://learn.microsoft.com/en-us/training/modules/cloud-native-apps-orchestrate-containers/
attribution: Copyright Rice University, OpenStax, under CC BY 4.0 license · CC BY 4.0 · Source出典
Figure 12.36 A cloud-native application is deployed in Azure. (attribution: Copyright Rice University, OpenStax, under CC BY 4.0 license)
図12.36 Azureに配置したクラウドネイティブアプリケーション。(出典:Copyright Rice University, OpenStax、CC BY 4.0ライセンス)
One microservice implements a web service in JavaScript using Node. Express.js is used to implement the REST API for the web service. Express.js is a back-end Node web application framework used to implement RESTful APIs. This microservice pushes data updates to a datastore via the REST API. The other microservice implements a web service using Next.js. Next.js is an open-source React framework used to create full-stack web applications. React is a library used to create components to render to certain environments including web and mobile applications. This microservice reads data from the same datastore.
英語のヒント
一方のマイクロサービスは、Nodeを使い、JavaScriptでWebサービスを実装する。WebサービスのREST APIにはExpress.jsを使う。Express.jsは、RESTful APIの実装に使う、バックエンド向けのNodeのWebアプリケーションフレームワークである。このマイクロサービスは、REST APIを介して、データの更新をデータストアへ送る。もう一方のマイクロサービスは、Next.jsでWebサービスを実装する。Next.jsは、フルスタックのWebアプリケーションを作るための、オープンソースのReactフレームワークである。Reactは、Webやモバイルアプリケーションなど、特定の環境へ描画する構成要素を作るためのライブラリである。このマイクロサービスは、同じデータストアからデータを読み出す。
Docker images are created for each microservice and pushed to an image registry. Azure’s Container Registry Service (ACR) is used for this purpose. Each microservice is self-contained and encapsulated into Docker containers that are pulled from ACR and deployed into worker nodes in a Kubernetes cluster. Scaling the microservices is managed by Kubernetes. The Azure Kubernetes Service (AKS) is used for this purpose. Both microservices communicate with a single datastore. The datastore used is a PostgreSQL database hosted in Azure.
英語のヒント
各マイクロサービスのDockerイメージを作り、イメージレジストリへ送る。このためにAzure Container Registry Service(ACR)を使う。各マイクロサービスは自己完結しており、Dockerコンテナーにカプセル化する。コンテナーをACRから取得し、Kubernetesクラスターのワーカーノードへ配置する。マイクロサービスの規模の調整は、Kubernetesが管理する。そのためにAzure Kubernetes Service(AKS)を使う。2つのマイクロサービスは、単一のデータストアと通信する。この例のデータストアは、Azure上のPostgreSQLデータベースである。
Prerequisites:
前提条件:
• Open a web browser and log into the Azure Portal. The Azure Portal is a web-based console that allows customers to manage their cloud services and Azure subscriptions.
• Webブラウザーを開き、Azure Portalへログインする。Azure Portalは、クラウドサービスとAzureのサブスクリプションを管理する、Webベースのコンソールである。
• An Azure resource group. An Azure resource group is a container that holds related resources used in a cloud solution. In this example, the resource group rg-nativeapps-eastus is used.
• Azureのリソースグループを用意する。リソースグループは、クラウドの仕組みで使う関連資源をまとめる入れ物である。この例では、rg-nativeapps-eastusを使う。
Set Up a Postgres Database in AzureAzureにPostgresデータベースを設定する
The first step is to create a datastore that both microservices will communicate with. Azure Database for PostgreSQL is the resource used for this purpose. The following steps create a relational database management service (RDBMS). Once the RDBMS is created, a PostgreSQL database is created along with tables to store the data. Finally, data is inserted into the database.
最初に、2つのマイクロサービスが通信するデータストアを作る。そのために使う資源が、Azure Database for PostgreSQLである。以下の手順では、リレーショナルデータベース管理サービス(RDBMS)を作成する。それができたら、データを保存する表とともに、PostgreSQLデータベースを作成する。最後に、データベースへデータを挿入する。
Create the Resource
資源を作成する
1. In the Azure Portal, search for Azure Database for PostgreSQL. Select Azure Database for PostgreSQL listed under the Marketplace section.
英語のヒント
1. Azure Portalで「Azure Database for PostgreSQL」を検索する。「Marketplace」の下に表示される「Azure Database for PostgreSQL」を選ぶ。
2. Select Azure Database for PostgreSQL Flexible server for the Resource type and click Create.
2. 「Resource type」で「Azure Database for PostgreSQL Flexible server」を選び、「Create」をクリックする。
3. On the Basics tab, configure the resource attributes. Table 12.1 shows the list of settings that should be used. Any settings not included in the table should be set to the default values provided in the wizard.
英語のヒント
3. 「Basics」タブで資源の属性を設定する。使う設定の一覧を表12.1に示す。表にない設定は、ウィザードに示される既定値のままにする。
Basics Tab Settings 「Basics」タブの設定 | |
|---|---|
Subscription Subscription(サブスクリプション) | Select the default subscription. 既定のサブスクリプションを選ぶ。 |
Resource group Resource group(リソースグループ) | For this example, rg-nativeapps-eastus is used. この例では、rg-nativeapps-eastusを使う。 |
Server name Server name(サーバー名) | Enter a unique name for the resource. For this example, na-dbserver-flex is used. 資源に一意の名前を入力する。この例では、na-dbserver-flexを使う。 |
Data source Data source(データソース) | Select None. Noneを選ぶ。 |
Location Location(場所) | For this example, select the region that is used for the resource group. この例では、リソースグループで使うリージョンを選ぶ。 |
Version Version(バージョン) | Select 11. 11を選ぶ。 |
Compute + storage Compute + storage(計算と記憶領域) | Click on the Configure server link. On the Configure blade, select Basic, set the vCore value to 1 and Storage to 2 GiB, and then click Save. 「Configure server」リンクをクリックする。「Configure」画面で「Basic」を選び、vCoreを1、Storageを2 GiBに設定して、「Save」をクリックする。 |
Admin username Admin username(管理者ユーザー名) | Enter a username. For this example, Student is used. ユーザー名を入力する。この例では、Studentを使う。 |
Password Password(パスワード) | Enter a password. For this example, Pa55w0rd1234 is used. パスワードを入力する。この例では、Pa55w0rd1234を使う。 |
Table 12.1 Configuration for the PostgreSQL Database
表12.1 PostgreSQLデータベースの設定
4. To create the resources as configured in the Table 12.1, click Review + create and then click Create. The provisioning of the database server may take several minutes. A status message appears when the deployment is complete. Click on Go to resource.
英語のヒント
4. 表12.1の設定で資源を作るため、「Review + create」をクリックし、続いて「Create」をクリックする。データベースサーバーの準備には、数分かかる場合がある。配置が完了すると、状態メッセージが表示される。「Go to resource」をクリックする。
Configure Connection Security
接続のセキュリティを設定する
Security policies need to be added to allow resources, including all microservices, to connect to the datastore securely. This step configures the connection security settings so that the microservices can securely connect to it. This is done on the Connection Security page for the datastore resource.
英語のヒント
すべてのマイクロサービスを含む資源が、安全にデータストアへ接続できるよう、セキュリティポリシーを追加する必要がある。この手順では、その接続のセキュリティを設定する。データストア資源の「Connection Security」ページで行う。
1. From the menu on the left under Settings, click Networking.
1. 左側のメニューの「Settings」の下で、「Networking」をクリックする。
◦ Enable the database server to allow connectivity from the cloud-native application deployed and running in Azure. To do this, click Yes for Allow access to Azure services. Immediately below this configuration, click + Add current client IP address (Figure 12.37).
◦ Azureに配置されて動いているクラウドネイティブアプリケーションから、データベースサーバーへの接続を許可する。そのために、「Allow access to Azure services」で「Yes」をクリックする。その設定のすぐ下の「+ Add current client IP address」をクリックする(図12.37)。
Image omitted because its reuse rights could not be verified.権利の確認ができないため画像を割愛。
Figure 12.37 It is important to configure the connection security settings so that the microservices can securely connect to it. (Used with permission from Microsoft)
図12.37 マイクロサービスが安全に接続できるよう、接続のセキュリティ設定を行うことが重要である。(Microsoftの許諾を得て使用)
◦ For this example, disable the SSL settings. If this step was missed before provisioning the database, do the following: click Server parameters. In the search field, search for “require_secure_transport.” Click Off (Figure 12.38).
◦ この例では、SSLの設定を無効にする。データベースの準備前にこの手順を忘れた場合は、次の操作を行う。「Server parameters」をクリックし、検索欄で「require_secure_transport」を検索する。「Off」をクリックする(図12.38)。
Image omitted because its reuse rights could not be verified.権利の確認ができないため画像を割愛。
Figure 12.38 Be sure to disable the SSL settings. (Used with permission from Microsoft)
図12.38 SSLの設定を確実に無効にする。(Microsoftの許諾を得て使用)
◦ Click Save.
◦ 「Save」をクリックする。
2. From the menu on the left, click Overview. Make a note of the Server name and Admin username values. These values are used to connect to the database from the cloud-native application deployed and running in Azure.
英語のヒント
2. 左側のメニューで「Overview」をクリックする。「Server name」と「Admin username」の値を控える。これらは、Azureに配置されて動いているクラウドネイティブアプリケーションから、データベースへ接続するときに使う。
Create the Database, Tables, and Initial Data
データベース、表、初期データを作成する
The datastore is now configured with a valid hostname and user account. The next step is to create a database and tables for the data to be stored. Once the database and tables are created, initial data is inserted.
英語のヒント
データストアには、有効なホスト名と利用者アカウントを設定できた。次に、データを保存するデータベースと表を作成する。それらができたら、初期データを挿入する。
1. Open the Azure Cloud Shell. To do this, click on the Cloud Shell icon to the right of the search bar in the Azure Portal. In the bottom frame of the browser page, the Cloud Shell will load. Click Bash, if prompted when the Cloud Shell loads. Click Create storage if prompted to complete loading the Cloud Shell.
英語のヒント
1. Azure Cloud Shellを開く。Azure Portalの検索バーの右側にあるCloud Shellアイコンをクリックする。ブラウザーページの下側の枠にCloud Shellが読み込まれる。読み込み時に選択を求められたら、「Bash」をクリックする。Cloud Shellの読み込みを完了するために求められたら、「Create storage」をクリックする。
2. In Cloud Shell, connect to the database with the following psql command. Insert the Server name and Admin username values obtained earlier for <server_name> and <username>, respectively as shown below. A postgres command prompt appears.
英語のヒント
2. Cloud Shellで、次のpsqlコマンドを使い、データベースへ接続する。下に示すように、先ほど取得したServer nameとAdmin usernameの値を、それぞれ<server_name>と<username>へ入れる。postgresのコマンドプロンプトが表示される。
psql –host=<server_name> --port=5432 –username=<user_name> --dbname=postgres3. Create the database, create a table, and insert data that will be used in this example.
英語のヒント
3. データベースと表を作成し、この例で使うデータを挿入する。
◦ Run the SQL statement below to create a new PostgreSQL database. The database name used in this example is cnainventory.
◦ 次のSQL文を実行し、新しいPostgreSQLデータベースを作成する。この例のデータベース名はcnainventoryである。
CREATE DATABASE cnainventory;◦ Run the command below to switch to the newly created database. This step is necessary so that the tables are created in the correct database.
◦ 次のコマンドを実行し、新しく作ったデータベースへ切り替える。正しいデータベースに表を作るため、この手順が必要である。
\c cnainventory◦ Run the SQL statement below to create a new table. The table created for this example is inventory. It contains four fields: id, which is the primary key, name, quantity, and date.
◦ 次のSQL文を実行し、新しい表を作成する。この例で作る表はinventoryである。主キーのidと、name、quantity、dateの、4つのフィールドを持つ。
CREATE TABLE inventory(
    id serial PRIMARY KEY,
    name VARCHAR(50),
    quantity INTEGER,
    date DATE NOT NULL DEFAULT NOW()::date
);
◦ Confirm the inventory table was created using the following command.
◦ 次のコマンドで、inventory表が作成されたことを確認する。
\dt◦ Insert data into the inventory table with the SQL statements below.
◦ 次のSQL文で、inventory表へデータを挿入する。
INSERT INTO inventory (id, name, quantity) VALUES (1,'yogurt', 200);
INSERT INTO inventory (id, name, quantity) VALUES (2,'milk', 100);
◦ Confirm the data was successfully inserted with the following command:
◦ 次のコマンドで、データが正常に挿入されたことを確認する。
SELECT *FROM inventory;◦ The output lists the data records.
◦ 出力には、データのレコードが一覧で表示される。
◦ Type \q to disconnect from the database.
◦ \qと入力し、データベースとの接続を切る。