第12章クラウドネイティブアプリケーション開発
Create and Deploy a Cloud-Native Applicationクラウドネイティブアプリケーションを作成し、配置する
Now that the datastore for the cloud-native application has been successfully created and configured, the next step is to create each of the two microservices of the cloud-native application. As previously mentioned, the cloud-native application consists of two microservices. One of the microservices is implemented using Node/Express.js. This microservice serves as a back-end service. The second microservice is implemented using Next.js and serves as a front-end web service. Although these microservices do not directly communicate with each other, both communicate with the datastore.
英語のヒント
クラウドネイティブアプリケーションのデータストアを正常に作成・設定できたので、次に、2つのマイクロサービスをそれぞれ作成する。先に述べたように、このアプリケーションは2つのマイクロサービスからなる。一方は、Node/Express.jsを使って実装し、バックエンドサービスとして動く。もう一方は、Next.jsで実装し、フロントエンドのWebサービスとして動く。この2つは互いに直接通信しないが、どちらもデータストアと通信する。
Create the Back-End Service
バックエンドサービスを作成する
The first microservice created is the back-end service. This service exposes a set of functions that can receive requests via a REST API that inserts inventory data into the datastore.
英語のヒント
最初に作るマイクロサービスは、バックエンドサービスである。これは、REST APIを介して要求を受け取り、在庫データをデータストアへ挿入する、一連の関数を公開する。
1. Open the Azure Cloud Shell. To do this, click on the Cloud Shell icon to the right of the search bar in the Azure Portal. In the bottom frame of the browser page, the Cloud Shell will load. Click Bash, if prompted when the Cloud Shell loads. Click Create storage if prompted to complete loading the Cloud Shell.
1. Azure Cloud Shellを開く。Azure Portalの検索バーの右側にあるCloud Shellアイコンをクリックする。ブラウザーページの下側の枠にCloud Shellが読み込まれる。読み込み時に選択を求められたら、「Bash」をクリックする。読み込みを完了するために求められたら、「Create storage」をクリックする。
2. Create a directory for the application and navigate into it with the following command.
英語のヒント
2. 次のコマンドで、アプリケーション用のディレクトリを作成し、その中へ移動する。
mkdir -p can-node-express && cd can-node-express3. Use the command to initialize a Node project. A package.json file, among other files, is generated for the Node project. The package.json file is updated to include dependencies for the Node/Express.js back-end service.
英語のヒント
3. 次のコマンドでNodeプロジェクトを初期化する。ほかのファイルとともに、package.jsonファイルが生成される。package.jsonは、Node/Express.jsのバックエンドサービスの依存関係を含むよう更新される。
npm init -y4. Express.js is used to build the REST API for the back-end service. Install Express.js with the following command. Confirm the package.json file is updated listing express as a dependency.
英語のヒント
4. Express.jsを使い、バックエンドサービスのREST APIを構築する。次のコマンドでExpress.jsをインストールする。package.jsonが更新され、依存要素としてexpressが記載されたことを確認する。
npm install express5. Create a new file named index.js with the command code index.js and add the code shown below. To save the file, type CTRL+S. Close the file by typing CTRL+Q. The code creates an Express application server that listens on port 8080. It accepts client requests sent in JSON format.
英語のヒント
5. code index.jsというコマンドで、index.jsという新しいファイルを作り、次のコードを追加する。CTRL+Sで保存し、CTRL+Qで閉じる。このコードは、ポート8080で待ち受けるExpressアプリケーションサーバーを作る。JSON形式で送られるクライアントの要求を受け付ける。
const express = require('express')
const port = process.env.PORT ǁ 8080
const app = express()
app.use(express.json())
app.listen(port, () => console.log('Sample app is listening on port ${port}!'))
Connect the Cloud-Native Application to the Database
クラウドネイティブアプリケーションをデータベースへ接続する
Now that the back-end service has been successfully created, the next step is to add code to the Express.js application that allows it to connect to the datastore. The object-relational mapping (ORM) technique converts a data object in the Express.js code to a table in the PostgreSQL relational database. Sequelize is used for this purpose.
バックエンドサービスを正常に作成できたので、次に、Express.jsアプリケーションがデータストアへ接続するためのコードを追加する。オブジェクト関係マッピング(ORM)は、Express.jsコード内のデータオブジェクトを、PostgreSQLリレーショナルデータベースの表へ変換する技法である。このためにSequelizeを使う。
1. In Azure Cloud Shell, run the command below to install the Sequelize package.
1. Azure Cloud Shellで次のコマンドを実行し、Sequelizeパッケージをインストールする。
npm i sequelize pg pg-hstore2. Edit the index.js file to add code that allows the Express.js application to connect to the cnainventory database. Insert the code below. Substitute the Server name value for <server_name> (appears twice). This code provides the connection hostname and user account to the datastore so that the back-end service can connect to it.
英語のヒント
2. index.jsを編集し、Express.jsアプリケーションがcnainventoryデータベースへ接続できるコードを追加する。次のコードを挿入する。2か所ある<server_name>を、Server nameの値で置き換える。このコードは、バックエンドサービスが接続できるよう、データストアへの接続ホスト名と利用者アカウントを指定する。
const Sequelize = require('sequelize')
const sequelize = new
Sequelize('postgres://Student%40<server_name>:Pa55w0rd1234@<server_name>.postgres.database.azure.com:5432/cnainventory)
sequelize
.authenticate()
.then(() => {
  console.log('Connection has been established successfully.');
})
.catch(err => {
  console.error('Unable to connect to the database:', err);
});
3. To use Sequelize in the Express.js application, add the following code to the file the index.js. This is the code that does the mapping between data objects in the Express.js code to data records in the database table. The variable Inventory is declared to define the mapping between the Express.js code and the inventory table. Notice how this definition contains the exact same fields that were declared in the inventory table in the cnainventory PostgreSQL database when it was created.
英語のヒント
3. Express.jsアプリケーションでSequelizeを使うため、index.jsに次のコードを追加する。Express.jsコードのデータオブジェクトを、データベース表のデータレコードへ対応付けるコードである。Express.jsコードとinventory表の対応を定義するため、変数Inventoryを宣言する。この定義が、cnainventory PostgreSQLデータベースでinventory表を作ったときに宣言したものと、まったく同じフィールドを持つことに注目しよう。
const Inventory = sequelize.define('inventory', {
  id: { type: Sequelize.INTEGER, allowNull: false, primaryKey: true },
  name: { type: Sequelize.STRING, allowNull: false },
  quantity: { type: Sequelize.INTEGER },
  date: { type: Sequelize.DATEONLY, defaultValue: Sequelize.NOW }
}, {
  freezeTableName: true,
  timestamps: false
});
Create the Express.js REST API Endpoints
Express.jsのREST APIエンドポイントを作成する
Now that the Express.js application is configured to access the PostgreSQL database, the next step is to create the REST API to accept client requests. These REST routes call functions that perform read and write operations on the PostgreSQL database. Two Express.js routes are added in the code. The first route performs a read from the database in response to receiving a GET HTTP request. The second route performs a write to the database in response to receiving a POST HTTP request.
英語のヒント
Express.jsアプリケーションからPostgreSQLデータベースへアクセスできるようになったので、次は、クライアントの要求を受け付けるREST APIを作成する。RESTのルートは、データベースの読み書きを行う関数を呼び出す。コードには、Express.jsのルートを2つ追加する。最初のルートは、HTTPのGET要求を受け取ると、データベースから読み出す。2つ目のルートは、HTTPのPOST要求を受け取ると、データベースへ書き込む。
1. Edit the index.js file and add the code shown. The code adds a route that accepts HTTP GET requests to fetch an inventory record. The ID for the record is included in the request, and the ID, name, quantity, and date fields for the inventory record are returned.
英語のヒント
1. index.jsを編集し、次のコードを追加する。HTTPのGET要求を受け付け、在庫レコードを取得するルートを追加するコードである。要求にはレコードのIDが含まれ、在庫レコードのID、name、quantity、dateのフィールドを返す。
app.get('/inventory/:id', async(req, res)=> {
  const id=req.params.id
  try {
const inventory = await Inventory.findAll({
  attributes: ['id', 'name', 'quantity', 'date'],
  where: {
    id: id
  } })
  res.json({ inventory })
} catch(error) {
  console.error(error)
}})
2. Add the second route by adding the following code to the index.js file. The code adds a route that accepts HTTP POST requests to create a new inventory record. Values for the record are included in the HTTP request body with exception for the date, which is calculated from the current date.
英語のヒント
2. index.jsへ次のコードを追加し、2つ目のルートを作る。HTTPのPOST要求を受け付け、新しい在庫レコードを作るルートである。レコードの値はHTTP要求の本文に含まれるが、dateだけは例外で、現在の日付から求める。
app.post('/inventory', async (req, res) => {
try {
  const newItem = new Inventory(req.body)
  await newItem.save()
  res.json({ inventory: newItem })
} catch(error) {
  Console.error(error)
}})
Create the Front-End Component
フロントエンドの構成要素を作成する
The second microservice created is the front-end web service. This web service provides a web-based user interface to fetch inventory data.
2つ目に作るマイクロサービスは、フロントエンドのWebサービスである。在庫データを取得するための、Webベースの利用者インターフェースを提供する。
1. In the Azure Cloud Shell, use this command to create a Next.js application.
1. Azure Cloud Shellで次のコマンドを使い、Next.jsアプリケーションを作成する。
npx create-next-app2. Answer the prompts. It is important to select No for the App Router prompt. Note that the project name is cna-next. This is the root directory for the Next.js application.
2. 質問に答える。App Routerの質問では、「No」を選ぶことが重要である。プロジェクト名はcna-nextである。この名前が、Next.jsアプリケーションのルートディレクトリになる。
3. Navigate into the cna-next directory.
3. cna-nextディレクトリへ移動する。
4. Recall in the back end, Express.js application Sequelize is used as the ORM to convert data objects in the Express.js code to data records in the inventory table in the database. Prisma is a Node ORM used to map data objects to tables in a relational database.
4. バックエンドのExpress.jsアプリケーションでは、コード内のデータオブジェクトを、データベースのinventory表のレコードへ変換するORMとして、Sequelizeを使ったことを思い出そう。Prismaは、データオブジェクトをリレーショナルデータベースの表へ対応付ける、NodeのORMである。
◦ Install the prisma and prisma-client packages with the following commands.
◦ 次のコマンドで、prismaとprisma-clientのパッケージをインストールする。
npm install prisma (npm install prisma -save-dev)
npm install @prisma/client
◦ Configure the Next.js application to use Prisma by running the command. This creates the prisma/ subdirectory and generates the schema.prisma configuration file inside it. This command also generates a dotenv (.env) file in the root directory of the project.
英語のヒント
◦ 次のコマンドを実行し、Next.jsアプリケーションでPrismaを使う設定を行う。prisma/というサブディレクトリが作成され、その中に設定ファイルschema.prismaが生成される。また、プロジェクトのルートディレクトリには、dotenv(.env)ファイルも生成される。
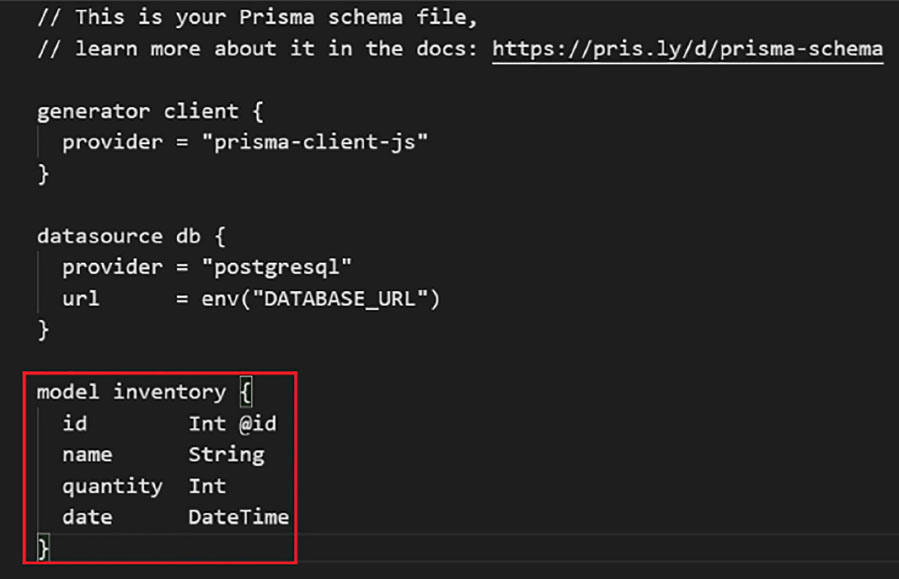
npx prisma init◦ In the prisma/ directory, edit the generated schema.prisma file and add the content shown in Figure 12.39. This adds the data model for the inventory table.
◦ prisma/ディレクトリで、生成されたschema.prismaを編集し、図12.39の内容を追加する。inventory表のデータモデルを追加する操作である。
attribution: Copyright Rice University, OpenStax, under CC BY 4.0 license · CC BY 4.0 · Source出典
Figure 12.39 This content adds the data model for the inventory table. (attribution: Copyright Rice University, OpenStax, under CC BY 4.0 license)
図12.39 inventory表のデータモデルを追加する内容。(出典:Copyright Rice University, OpenStax、CC BY 4.0ライセンス)
◦ Notice how the schema.prisma is configured to read the data source database URL from a dotenv (.env) file. In the cna-next/ directory, edit the generated dotenv (.env) file and change the database connection string as shown in the code snippet below. Replace USER_NAME with Admin name, PASSWORD with Password, and SERVER_NAME with Server name for the cnainventory PostgreSQL database.
英語のヒント
◦ schema.prismaは、dotenv(.env)ファイルからデータソースのデータベースURLを読む設定になっている。cna-next/ディレクトリで、生成されたdotenv(.env)ファイルを編集し、接続文字列を次のコード断片のように変える。USER_NAMEをAdmin name、PASSWORDをPassword、SERVER_NAMEをServer nameで、それぞれ置き換える。いずれも、cnainventory PostgreSQLデータベースの値を使う。
DATABASE_URL="postgresql://USER_NAME%40SERVER_NAME:PASSWORD@SERVER_NAME.postgres.database.azure.com:5432/cnainventory"◦ Make a copy of the .env file and name it .env.local as this is the file that will be copied into the Docker container and used by Prisma.
英語のヒント
◦ .envファイルを複製し、.env.localという名前にする。このファイルがDockerコンテナーへコピーされ、Prismaで使われるためである。
◦ To use Prisma in the Next.js application, the Prisma Client must be configured. The Prisma Client serves as a query builder tailored to the application data. Query builders are part of the ORM that generate the SQL queries used to perform the database operations for the application. To do this, run the command:
英語のヒント
◦ Next.jsアプリケーションでPrismaを使うには、Prisma Clientを設定しなければならない。Prisma Clientは、アプリケーションのデータに合わせたクエリビルダーとして働く。クエリビルダーはORMの一部であり、アプリケーションのデータベース操作に使うSQLクエリを生成する。そのために、次のコマンドを実行する。
npx prisma generate◦ Add the Prisma Client code to the Next.js application. To do this, create the lib/ subdirectory and navigate into it.
◦ Next.jsアプリケーションへPrisma Clientのコードを追加する。そのために、lib/サブディレクトリを作成し、その中へ移動する。
◦ Inside the lib/ directory, create the file prisma.tsx and add the following code.
◦ lib/ディレクトリ内にprisma.tsxを作成し、次のコードを追加する。
import { PrismaClient } from '@prisma/client'

const globalForPrisma = global as unknown as {
prisma: PrismaClient | undefined
}

export const prisma =
globalForPrisma prisma ??
new PrismaClient({
log: ['query'],
})

if(process.env.NODE_ENV !=='production') globalForPrisma.prisma = prisma
5. Now that the Next.js application is configured to map to the inventory table, the next step is to implement the web service code. The web service code consists of React components that render in a browser. The React component InventoryProps is an array of data records once fetched from the database. The React component Inventory implements how the data is displayed as a web page in the browser. The React component Layout adds additional navigation to the web page.
5. Next.jsアプリケーションをinventory表へ対応付ける設定ができたので、次に、Webサービスのコードを実装する。コードは、ブラウザーで描画するReactコンポーネントからなる。ReactコンポーネントInventoryPropsは、データベースから取得したデータレコードの配列である。ReactコンポーネントInventoryは、データをブラウザーのWebページとしてどう表示するかを実装する。ReactコンポーネントLayoutは、ページにナビゲーションを追加する。
◦ In the cna-next/ directory:
◦ cna-next/ディレクトリで、次を行う。
▪ Create and navigate to a directory named components/ and add the two code files that follow into it (confirm the components/ directory is at the same level as the pages/ directory that was generated):
英語のヒント
▪ components/というディレクトリを作成してその中へ移動し、以下の2つのコードファイルを追加する。components/が、生成されたpages/と同じ階層にあることを確認する。
▪ Create the file Inventory.tsx and add the code that follows.
▪ Inventory.tsxを作成し、次のコードを追加する。
import React from "react";

export type InventoryProps = {
  id: string;
  name: string;
  quantity: string;
  date: string;
};

constInventory: React.FC<{ inventoryrec: InventoryProps }>=({
inventoryrec})=> {return(
  <div
  className="flex bg-white shadow-lg rounded-lg mx-2 md:mx-auto mb-5 max-w-2xl"
  >
  <divclassName="flex items-start px-4 py-3">
    <div className="">
      <div className="inline items-center justify-between">
        <p className="text-gray-700 text-sm">
        <strong>ID: {inventoryrec.id}</strong> Name: {inventoryrec.name}
(quantity: {inventoryrec.quantity})
        </p>
        <small className="text-red-700 text-sm">
        Date: {inventoryrec.date.toString().substring(0,10)}
        </small>
      </div>
    </div>
  </div>
</div>
</div>
);
};

export default Inventory;
▪ Create the file Layout.tsx and add the following code.
▪ Layout.tsxを作成し、次のコードを追加する。
import React,{ ReactNode } from "react";
import Head from "next/head";

type Props = {
  children: ReactNode;
};

const Layout: React.FC<Props> = (props) => (
  <div>
    <div className="w-full text-center bg-red-800 flex flex-wrap items-center">
      <div className="text-3xl w-1/2 text-white mx-2 md:mx-auto py-5">
        Inventory Data
      </div>
  </div>
  <div className="layout">{props.children}</div>
  <style jsx global>{`
    html {
      box-sizing: border-box;
    }
    *,
    *:before,
    *:after {
      box-sizing: inherit;
    }
    body {
      margin: 0;
      padding: 0;
      font-size: 16px;
      font-family: -apple-system,BlinkMacSystemFont,"Segoe UI",Roboto,
        Helvetica,Arial,sans-serif,"Apple Color Emoji","Segoe UI Emoji",
        "Segoe UI Symbol";
      background: rgba(0,0,0,0.05);
    }
    input,
    textarea {
      font-size: 16px;
    }
    button {
      cursor: pointer;
    }
  `}</style>
  <style jsx>{`
    .layout {
      padding: 0 2rem;
    }
  `}</style>
  </div>
);

export default Layout;
◦ Edit the index.tsx file and replace the default code with the following code.
◦ index.tsxを編集し、既定のコードを次のコードで置き換える。
declare global {
  namespace NodeJS {
    interface Global {
      prisma: any;
    }
  }
}

import { prisma } from '../lib/prisma';
import Inventory,{ InventoryProps } from "../components/Inventory";
import Layout from "../components/Layout"

export const getServerSideProps = async () => {
  const inventoryrecs = await prisma.inventory.findMany({
  })
  return { props: { inventoryrecs: JSON.parse(JSON.stringify(inventoryrecs)) }
}
}

type Props = {
  inventoryrecs: InventoryProps[]
}

// index.tsx
const InventoryFeed: React.FC<Props> = (props) => {
  return (
    <Layout>
      <div className="page">
        <br/>
        <main>
          {props.inventoryrecs.map((inventoryrec) => (
            <div key={inventoryrec.id} className="post">
              <Inventory inventoryrec={inventoryrec} />
            </div>
          ))}
        </main>
      </div>
      <style jsx>{`
        .post:hover {
          box-shadow: 1px 1px 3px #aaa;
        }
        .post + .post {
          margin-top: 2rem;
        }
      `}</style>
    </Layout>
  )
}

export default InventoryFeed