第12章クラウドネイティブアプリケーション開発
Build and Store Microservices Images in an Azure Container Registryマイクロサービスのイメージを構築し、Azure Container Registryへ保存する
Now that the two microservices for the cloud-native application have been successfully created, the next step is to create an Azure Container Registry (ACR) to store Docker images for these microservices. Each microservice of the cloud-native application is containerized. Their images are pulled from the ACR and deployed in a Kubernetes environment hosted in the cloud.
クラウドネイティブアプリケーションの2つのマイクロサービスを正常に作成できたので、次に、そのDockerイメージを保存するAzure Container Registry(ACR)を作る。各マイクロサービスは、コンテナー化される。イメージをACRから取得し、クラウド上のKubernetes環境へ配置する。
Create the Azure Container Registry
Azure Container Registryを作成する
1. In the Azure Portal, on the home page, click on Create a resource. Click Container Registry.
1. Azure Portalのホームページで「Create a resource」をクリックする。「Container Registry」をクリックする。
2. On the Basics tab, configure the resource attributes. Table 12.2 shows the list of settings to configure on the Basics tab. Any settings not included should be set to the default values provided in the wizard.
2. 「Basics」タブで資源の属性を設定する。設定する項目を表12.2に示す。表にない項目は、ウィザードで示される既定値のままにする。
Basics Tab Settings 「Basics」タブの設定 | |
|---|---|
Subscription Subscription(サブスクリプション) | Select the default subscription. 既定のサブスクリプションを選ぶ。 |
Resource group Resource group(リソースグループ) | For this example, rg-nativeapps-eastus is used. この例では、rg-nativeapps-eastusを使う。 |
Registry name Registry name(レジストリ名) | Enter a unique name for the resource. For this example, ncaregistryflex is used. 資源に一意の名前を入力する。この例では、ncaregistryflexを使う。 |
Location Location(場所) | For this example, select the region that is used for the resource group. この例では、リソースグループで使うリージョンを選ぶ。 |
SKU | Select Standard. Standardを選ぶ。 |
Table 12.2 Configuration for the Azure Container Registry
表12.2 Azure Container Registryの設定
3. Click Review + create. Make a note of the Registry name and Resource Group as these will be needed in a later step. Click Create. When the provisioning is completed, a status message appears.
3. 「Review + create」をクリックする。後の手順で必要になるため、Registry nameとResource Groupを控える。「Create」をクリックする。準備が完了すると、状態メッセージが表示される。
4. Click on Go to resource. Make a note of the registry name that was provided in the create wizard. In this example, the registry name is ncaregistryflex.
4. 「Go to resource」をクリックする。作成ウィザードで指定したレジストリ名を控える。この例では、ncaregistryflexである。
5. Generate access keys for the container registry, which will be needed later. For this example, the container registry used is ncaregistryflex. In the Azure Portal, navigate to the container registry resource. From the menu on the left, under Settings, click Access keys. Enable Admin user.
英語のヒント
5. 後で必要になるコンテナーレジストリのアクセスキーを生成する。この例では、ncaregistryflexを使う。Azure Portalで、そのコンテナーレジストリ資源へ移動する。左側のメニューで、「Settings」の下の「Access keys」をクリックする。「Admin user」を有効にする。
Build the Docker ImagesDockerイメージを構築する
Now that the container registry has been successfully created, the next step is to build Docker images for each microservice. These images are then pushed to the container registry.
コンテナーレジストリを正常に作成できたので、次に各マイクロサービスのDockerイメージを構築する。その後、イメージをコンテナーレジストリへ送る。
1. Setting specific environment variables makes it easier to run the commands that follow. In the Azure Cloud Shell, run the following commands to set the required environment variables. Note the resource group name in this example is rg-nativeapps-eastus. The registry name in this example is ncaregistryflex.
英語のヒント
1. 特定の環境変数を設定しておくと、以後のコマンドを実行しやすくなる。Azure Cloud Shellで次のコマンドを実行し、必要な環境変数を設定する。この例のリソースグループ名はrg-nativeapps-eastus、レジストリ名はncaregistryflexである。
RESOURCEGROUP={resource-group-name}
REGISTRYNAME={registry_name}
Containerize the Back-End Service
バックエンドサービスをコンテナー化する
To containerize the back-end service, a Dockerfile must be created with a list of instructions to build the Docker image.
バックエンドサービスをコンテナー化するには、Dockerイメージの構築手順を列挙したDockerfileを作成しなければならない。
1. Navigate to the can-node-express/ directory. Create a Dockerfile and add the instructions below. The Dockerfile starts with a base image for Node indicated by the FROM instruction. A working directory is created and the package.json file is copied into it. The dependencies listed in the package.json file are used to install the dependent packages. Next, the source code for the Express.js application is copied. Port 8080 is exposed for the Express.js application listens on. Finally, the command to start the Express.js application server is added as the last instruction.
英語のヒント
1. can-node-express/ディレクトリへ移動する。Dockerfileを作成し、次の命令を追加する。Dockerfileは、FROM命令で指定するNodeのベースイメージから始まる。作業ディレクトリを作り、package.jsonをそこへコピーする。package.jsonに列挙した依存関係を使い、必要なパッケージをインストールする。次に、Express.jsアプリケーションのソースコードをコピーする。アプリケーションが待ち受けるポート8080を公開する。最後の命令として、Express.jsアプリケーションサーバーを起動するコマンドを加える。
FROM node:14-alpine
# Create app directory
WORKDIR /src
# Copy package.json and package-lock.json
COPY package*.json /src/
# Install npm dependencies
ENV NODE_ENV=production
RUN npm ci --only=production
# Bundle app source
COPY ./src
EXPOSE 8080
CMD [ "node", "index.js" ]
2. Build the Docker image and push it to the ACR registry. The Docker image must be built locally and then pushed to the ACR registry later. This is assumed a Docker engine is installed on the local computer. To build the image, run the command below. Notice the command has a space followed by a “.” at the end. This references the current directory and must be part of the command. Wait until the Docker image build is complete.
英語のヒント
2. Dockerイメージを構築し、ACRレジストリへ送る。イメージはローカルで構築し、その後ACRへ送る必要がある。ローカルコンピューターには、Dockerエンジンをインストール済みとする。次のコマンドでイメージを構築する。末尾に空白と「.」があることに注意しよう。これは現在のディレクトリを指し、コマンドに必ず含める。Dockerイメージの構築が完了するまで待つ。
docker build -t expressimage .3. Test run the back-end application by running the Docker container. Run the following command.
3. Dockerコンテナーを実行し、バックエンドアプリケーションを試運転する。次のコマンドを実行する。
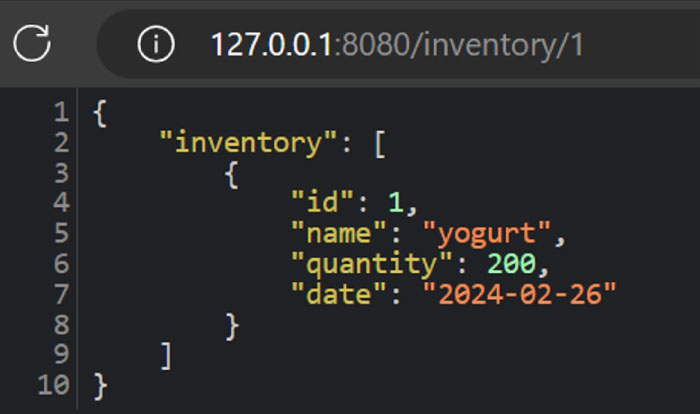
docker run -d --name expressimage -p 8080:8080 expressimage:latest4. Open a browser and enter the URL: http://127.0.0.1:8080/inventory/1.
4. ブラウザーを開き、http://127.0.0.1:8080/inventory/1というURLを入力する。
attribution: Copyright Rice University, OpenStax, under CC BY 4.0 license · CC BY 4.0 · Source出典
(attribution: Copyright Rice University, OpenStax, under CC BY 4.0 license)
(出典:Copyright Rice University, OpenStax、CC BY 4.0ライセンス)
5. Tag the image so that it can be pushed to the ACR registry with the command below. Note: run “docker images” to confirm the correct image name is used for the docker tagging. Substitute <registry_name> with the correct name of the ACR registry.
英語のヒント
5. 次のコマンドで、ACRレジストリへ送れるようイメージにタグを付ける。「docker images」を実行し、タグ付けに正しいイメージ名を使っていることを確認する。<registry_name>は、ACRレジストリの正しい名前に置き換える。
docker tag expressimage:latest <registry_name>.azurecr.io/expressimage:v1Containerize the Front-End Service
フロントエンドサービスをコンテナー化する
To containerize the front-end service, a Dockerfile must also be created with a list of instructions to build the Docker image.
フロントエンドサービスをコンテナー化する場合も、Dockerイメージの構築手順を列挙したDockerfileを作成する必要がある。
1. Navigate to the can-next/ directory. Create the Dockerfile and add the instructions below. The Dockerfile starts with a base image for Node indicated by the FROM instruction. A working directory is created and the package.json file is copied into it. The dependencies listed in the package.json file are used to install the dependent packages. Next, the source code for the Next.js application is copied. The Prisma client is generated. Port 3000 is exposed because the Next.js application listens on port 3000. Finally, the command to start the Next.js application server is added as the last instruction.
1. can-next/ディレクトリへ移動する。Dockerfileを作成し、次の命令を追加する。Dockerfileは、FROM命令で指定するNodeのベースイメージから始まる。作業ディレクトリを作り、package.jsonをそこへコピーする。package.jsonに列挙した依存関係を使い、必要なパッケージをインストールする。次に、Next.jsアプリケーションのソースコードをコピーし、Prismaクライアントを生成する。Next.jsアプリケーションがポート3000で待ち受けるため、そのポートを公開する。最後の命令として、Next.jsアプリケーションサーバーを起動するコマンドを加える。
FROM node:lts-buster-slim AS base
RUN apt"-" get update && apt"-" get install libssl"-" dev ca"-" certificates "-" y
WORKDIR /app
COPY package.json package"-" lock.json ./
FROM base as build
RUN export NODE_ENV"=" production
RUN yarn
COPY . .
RUN npx prisma generate
RUN yarn build
FROM base as prod"-" build
RUN yarn install "--" production
COPY prisma prisma
RUN npx prisma generate
RUN cp "-" R node_modules prod_node_modules
FROM base as prod
COPY "--" from"=" prod"-" build /app/prod_node_modules /app/node_modules
COPY "--" from"=" build /app/.next /app/.next
COPY "--" from"=" build /app/public /app/public
COPY "--" from"=" build /app/prisma /app/prisma
EXPOSE 3000
CMD ["yarn","start"
2. Create the docker-compose.yml file and add the content below. This step is required so that the .env.local file is properly copied into the Docker container.
2. docker-compose.ymlを作成し、次の内容を追加する。.env.localをDockerコンテナー内へ正しくコピーするために必要な手順である。
services:
  web:
    ports:
      – "3000:3000"
    build:
      dockerfile: Dockerfile
      context: ./
    volumes:
      – .env.local:/app/.env.local
3. Build the Docker image and push it to the ACR registry with this command. The Docker image must be built locally and then pushed to the ACR registry later. To build the image, run the command below. The command will build the image and then run the container. Wait until the image builds and the container starts.
英語のヒント
3. 次のコマンドでDockerイメージを構築し、ACRレジストリへ送る。イメージはローカルで構築し、その後ACRへ送る必要がある。以下のコマンドを実行すると、イメージを構築した後、コンテナーを実行する。イメージが完成し、コンテナーが起動するまで待つ。
docker compose up -dTo stop the container, run the command
docker compose down.コンテナーを停止するには、docker compose downというコマンドを実行する。
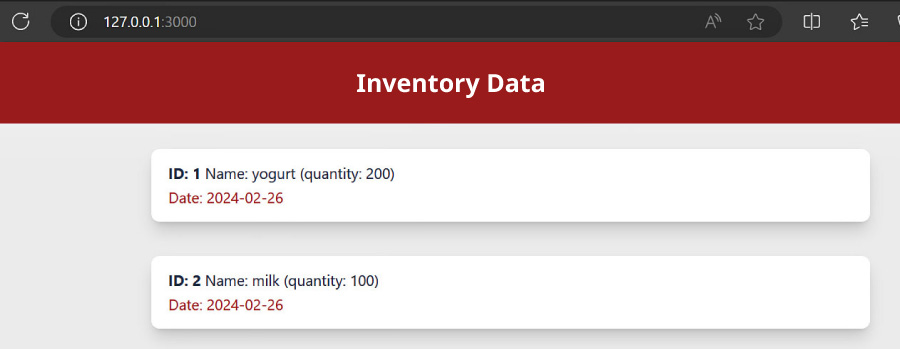
4. Test run the front-end application. Because docker compose was used for the front end, the Docker container is already running. Open a browser and enter the URL http://127.0.0.1:3000.
4. フロントエンドアプリケーションを試運転する。フロントエンドにはdocker composeを使ったため、Dockerコンテナーはすでに動いている。ブラウザーを開き、http://127.0.0.1:3000というURLを入力する。
rendered using Docker; attribution: Copyright Rice University, OpenStax, under CC BY 4.0 license · CC BY 4.0 · Source出典
(rendered using Docker; attribution: Copyright Rice University, OpenStax, under CC BY 4.0 license)
(Dockerで描画。出典:Copyright Rice University, OpenStax、CC BY 4.0ライセンス)
5. Tag the image so that it can be pushed to the ACR registry with the command below. Note: run “docker images” to confirm the correct image name is used for the docker tagging. Substitute <registry_name> with the correct name of the ACR registry.
5. 次のコマンドで、ACRレジストリへ送れるようイメージにタグを付ける。「docker images」を実行し、タグ付けに正しいイメージ名を使っていることを確認する。<registry_name>は、ACRレジストリの正しい名前に置き換える。
docker tag cna-next_web:latest <registry_name>.azurecr.io/cna-next_web:v16. Push Images to ACR Registry. First, confirm the images for both the front-end and back-end applications are tagged properly. Run the command: “docker images.” The following four images should be listed (the originally built images, and then the images tagged for the ACR registry).
6. イメージをACRレジストリへ送る。まず、フロントエンドとバックエンド両方のイメージに、正しくタグが付いたことを確認する。「docker images」を実行する。最初に構築したイメージと、ACRレジストリ向けにタグを付けたイメージという、次の4つが表示されるはずである。

attribution: Copyright Rice University, OpenStax, under CC BY 4.0 license · CC BY 4.0 · Source出典
(attribution: Copyright Rice University, OpenStax, under CC BY 4.0 license)
(出典:Copyright Rice University, OpenStax、CC BY 4.0ライセンス)
7. Log in to the ACR registry with the command below.
7. 次のコマンドで、ACRレジストリへログインする。
az acr login --name $REGISTRYNAMENote: running the above command assumes being logged into the Azure Portal. This can be done with the following Azure CLI command.
英語のヒント
上のコマンドの実行は、Azure Portalへログインしていることを前提とする。次のAzure CLIコマンドでログインできる。
az login --scope https://management.core.windows.net//.default8. Push both images to the ACR registry. Run the two commands below. Substitute <registry_name> with the correct name of the ACR registry.
8. 両方のイメージをACRレジストリへ送る。次の2つのコマンドを実行する。<registry_name>は、ACRレジストリの正しい名前に置き換える。
docker push <registry_name>.azurecr.io/expressimage:v1
docker push <registry_name>.azurecr.io/cna-next_web:v1
9. In the Azure Console, navigate to the container registry and click on the registry name, ncaregistryflex. Under Services, click Repositories. Confirm that both image repositories are created. For this example, the repositories are expressimage and cna-next-web.
9. Azure Consoleでコンテナーレジストリへ移動し、レジストリ名ncaregistryflexをクリックする。「Services」の下で「Repositories」をクリックする。両方のイメージリポジトリが作成されたことを確認する。この例では、expressimageとcna-next-webである。