第12章クラウドネイティブアプリケーション開発
Create an Azure Kubernetes Service InstanceAzure Kubernetes Serviceのインスタンスを作成する
Now that the Docker images for the two microservices have been created and pushed to their respective repositories, the next step is to create a Kubernetes cluster.
英語のヒント
2つのマイクロサービスのDockerイメージを作成し、それぞれのリポジトリへ送れたので、次はKubernetesクラスターを作成する。
1. In the Azure Portal search bar, search for Kubernetes services. Click on Kubernetes services. Select Create a Kubernetes cluster.
1. Azure Portalの検索バーで「Kubernetes services」を検索する。「Kubernetes services」をクリックし、「Create a Kubernetes cluster」を選ぶ。
2. On the Azure Portal Home page, click on Create a resource. From the menu on the left, click Containers. Click on Azure Kubernetes Service (AKS).
2. Azure Portalのホームページで「Create a resource」をクリックする。左側のメニューで「Containers」をクリックし、「Azure Kubernetes Service (AKS)」をクリックする。
3. On the Basics tab, configure the resource attributes. Table 12.3 shows the list of settings to configure on the Basics tab. Any settings not included should be set to the default values provided in the wizard.
英語のヒント
3. 「Basics」タブで資源の属性を設定する。表12.3に、設定する項目の一覧を示す。表にない項目は、ウィザードが示す既定値のままにする。
Basics Basics(基本) | Tab Settings タブの設定 |
|---|---|
Subscription Subscription(サブスクリプション) | Select the default subscription. 既定のサブスクリプションを選ぶ。 |
Resource group Resource group(リソースグループ) | For this example, rg-nativeapps-eastus is used. この例では、rg-nativeapps-eastusを使う。 |
Kubernetes cluster name Kubernetes cluster name(Kubernetesクラスター名) | Enter a unique name for the resource. For this example, nca-aks is used. 資源に一意の名前を入力する。この例では、nca-aksを使う。 |
Scale method Scale method(規模の調整方法) | Select Manual. Manualを選ぶ。 |
Location Location(場所) | For this example, select the region that is used for the resource group. この例では、リソースグループで使うリージョンを選ぶ。 |
Node count Node count(ノード数) | Set to 2. 2に設定する。 |
Table 12.3 Configuration for the Azure Kubernetes Service
表12.3 Azure Kubernetes Serviceの設定
4. On the Integrations tab, select the container registry that was created previously.
4. 「Integrations」タブで、先ほど作成したコンテナーレジストリを選ぶ。
5. Click Review + create. Then, click Create. Wait until the Kubernetes cluster is provisioned.
5. 「Review + create」をクリックし、続いて「Create」をクリックする。Kubernetesクラスターが用意されるまで待つ。
Deploy Microservices to the Kubernetes ClusterマイクロサービスをKubernetesクラスターへ配置する
Now that the Kubernetes cluster is provisioned successfully, the next step is to deploy the containerized microservices into it. The images for these microservices are pulled from the registry and deployed into pods in the Kubernetes cluster.
Kubernetesクラスターを正常に用意できたので、次に、コンテナー化したマイクロサービスをその中へ配置する。レジストリから各イメージを取得し、クラスター内のポッドへ配置する。
Set Up the Environment
環境を設定する
1. Setting specific environment variables makes it easier to run the commands that follow. Environment variables need to be set up for the resource group, Kubernetes cluster, and the container registry. Run the following commands to set these variables. Note that for this example, the resource group used is rg-nativeapps-eastus, the Kubernetes cluster name used is nca-aks, and the registry name is ncaregistry.
1. 特定の環境変数を設定すると、以後のコマンドを実行しやすくなる。リソースグループ、Kubernetesクラスター、コンテナーレジストリの環境変数を設定する必要がある。次のコマンドを実行する。この例では、リソースグループはrg-nativeapps-eastus、Kubernetesクラスター名はnca-aks、レジストリ名はncaregistryである。
RESOURCEGROUP={resource_group}
CLUSTERNAME={cluster_name}
REGISTRYNAME={registry_name}
2. The Kubernetes cluster must be able to connect to the ACR registry to pull the Docker images from it. Connect the Kubernetes cluster to the ACR registry using this command.
2. Dockerイメージを取得するため、KubernetesクラスターはACRレジストリへ接続できなければならない。次のコマンドで、クラスターをACRレジストリへ接続する。
az aks get-credentials --resource-group $RESOURCEGROUP --name $CLUSTERNAME3. Kubectl is the Kubernetes command-line tool that is used to manage Kubernetes clusters. This is the tool that interacts with the Kubernetes cluster on Azure. The first step in interacting with the Kubernetes cluster is to connect to it. Run the command, which lists the nodes of the Kubernetes cluster. The output lists the nodes for the cluster.
英語のヒント
3. Kubectlは、Kubernetesクラスターを管理するコマンドラインツールである。Azure上のクラスターとのやり取りに使う。最初の手順は、クラスターへの接続である。次のコマンドを実行し、クラスターのノードを一覧表示する。出力には、そのクラスターのノードが列挙される。
kubectl get nodes4. The next step is to obtain the hostname to the ACR registry. This is added to the deployment manifest files for the microservices so that the Docker images can be pulled from the registry and deployed into the Kubernetes cluster. Run the command to query the ACR server.
英語のヒント
4. 次に、ACRレジストリのホスト名を取得する。Dockerイメージをレジストリから取得してKubernetesクラスターへ配置できるよう、ホスト名をマイクロサービスの配置マニフェストファイルへ追加する。次のコマンドで、ACRサーバーへ問い合わせる。
az acr list --resource-group $RESOURCEGROUP --query
"[].{acrLoginServer:loginServer}" --output table
Create and Apply the Deployment Manifests
配置マニフェストを作成し、適用する
Deployment manifest files are used to deploy the Docker images for the microservices into the Kubernetes cluster. They provide declarative updates for the Kubernetes Pods and ReplicaSets for the microservices. Initially, only one instance of each microservice is made available. Each microservice can scale up or down as needed.
英語のヒント
配置マニフェストファイルは、マイクロサービスのDockerイメージをKubernetesクラスターへ配置するために使う。マイクロサービスのKubernetes PodsとReplicaSetsに、宣言的な更新を与える。最初は、各マイクロサービスのインスタンスを1つだけ利用できるようにする。必要に応じて、それぞれの規模を拡大・縮小できる。
1. Create a deployment manifest file for the Docker image, expressimage, for the back-end service. Create the express-deployment.yaml file and enter the following content. The deployment manifest deploys the back-end service with the label cna-express. In this deployment manifest file, the Docker image is pulled from the registry and gets deployed in a pod in Kubernetes.
1. バックエンドサービスのDockerイメージexpressimage用の配置マニフェストを作る。express-deployment.yamlを作成し、次の内容を入力する。cna-expressというラベルで、バックエンドサービスを配置するマニフェストである。レジストリからDockerイメージを取得し、Kubernetesのポッドへ配置する。
  # deployment.yaml
apiVersion: apps/v1
kind: Deployment
metadata:
  name: cna-express
spec:
  selector: # Define the wrapping strategy
    matchLabels: # Match all pods with the defined labels
      app: cna-express # Labels follow the `name: value` template
  template: # This is the template of the pod inside the deployment
    metadata:
      labels:
        app: cna-express
    spec:
      containers:
        - image: ncaregistry.azurecr.io/expressimage
          name: expressimage
          ports:
            - containerPort: 80
2. Apply the deployment manifest to the Kubernetes cluster with the following command. A message indicates that the deployment object was successfully created.
2. 次のコマンドで、配置マニフェストをKubernetesクラスターへ適用する。deploymentオブジェクトの作成に成功したというメッセージが表示される。
kubectl apply -f ./express-deployment.yaml3. Create a deployment manifest file for the Docker image, webimage, for the front-end service. Create the web-deployment.yaml file and enter the following content. The deployment manifest deploys the front-end service with the label cna-web. In this deployment manifest file, the Docker image is pulled from the registry and gets deployed in a pod in Kubernetes.
3. フロントエンドサービスのDockerイメージwebimage用の配置マニフェストを作る。web-deployment.yamlを作成し、次の内容を入力する。cna-webというラベルで、フロントエンドサービスを配置するマニフェストである。レジストリからDockerイメージを取得し、Kubernetesのポッドへ配置する。
# deployment.yaml
apiVersion: apps/v1
kind: Deployment
metadata:
  name: cna-web
spec:
  selector: # Define the wrapping strategy
    matchLabels: # Match all pods with the defined labels
      app: cna-web # Labels follow the `name: value` template
  template: # This is the template of the pod inside the deployment
    metadata:
      labels:
        app: cna-web
    spec:
      containers:
        - image: ncaregistry.azurecr.io/webimage
          name: webimage
          ports:
            - containerPort: 80
4. Apply the deployment manifest to the Kubernetes cluster with this command. A message indicates that the deployment object was successfully created.
4. 次のコマンドで、配置マニフェストをKubernetesクラスターへ適用する。deploymentオブジェクトの作成に成功したというメッセージが表示される。
kubectl apply -f ./web-deployment.yaml5. Confirm the deployments for both the back-end and front-end services were successful with the following commands. Both microservices should display a status of “Running” in the Kubernetes cluster.
5. 次のコマンドで、バックエンドとフロントエンド両方の配置が成功したことを確認する。どちらも、Kubernetesクラスターで「Running」という状態になるはずである。
kubectl get deploy cna-express
kubectl get pods
6. In the Azure Console, navigate to the Kubernetes resources page. Click on Workloads. The microservices are deployed with a status of Ready.
6. Azure Consoleで、Kubernetesの資源ページへ移動する。「Workloads」をクリックする。マイクロサービスは、「Ready」の状態で配置されている。
Image omitted because its reuse rights could not be verified.権利の確認ができないため画像を割愛。
(Used with permission from Microsoft)
(Microsoftの許諾を得て使用)
Create and Apply the Service Manifests
サービスマニフェストを作成し、適用する
Both microservices are now deployed in a Kubernetes cluster. Kubernetes Services are created for each microservice so that they can receive client requests. Kubernetes provides the Pods where the microservices are deployed with IP addresses and a single fully qualified domain name (FQDN) for a set of Pods. In addition, Services expose TCP ports to the containers where the microservices are running.
英語のヒント
2つのマイクロサービスをKubernetesクラスターへ配置できた。クライアントの要求を受け付けられるよう、それぞれにKubernetes Serviceを作成する。Kubernetesは、マイクロサービスを配置したポッドにIPアドレスを与え、ポッドの集合に単一の完全修飾ドメイン名(FQDN)を与える。また、Serviceは、マイクロサービスが動くコンテナーへTCPポートを公開する。
1. Create a service manifest file for the Docker image, expressimage, for the back-end service. Create the express-service.yaml file and enter the following content. The service manifest creates the Kubernetes Service for the back-end service with the label cna-express.
1. バックエンドサービスのDockerイメージexpressimage用に、サービスマニフェストを作成する。express-service.yamlを作り、次の内容を入力する。cna-expressというラベルで、バックエンド用のKubernetes Serviceを作るマニフェストである。
#service.yaml
apiVersion: v1
kind: Service
metadata:
  name: cna-express
spec:
  type: ClusterIP
  selector:
    app: cna-express
  ports:
    - port: 8080 # SERVICE exposed port
      name: http # SERVICE port name
      protocol: TCP # The protocol the SERVICE will listen to
      targetPort: 8080
2. Apply the service manifest to the Kubernetes cluster with this command. A message indicates that the service object was successfully created.
2. 次のコマンドで、サービスマニフェストをKubernetesクラスターへ適用する。serviceオブジェクトの作成に成功したというメッセージが表示される。
kubectl apply -f ./express-service.yaml3. Create a service manifest file for the Docker image, webimage, for the front-end service. Create the web-service.yaml file and enter the following content. The service manifest creates the Kubernetes Service for the front-end web service with the label cna-web.
3. フロントエンドサービスのDockerイメージwebimage用に、サービスマニフェストを作成する。web-service.yamlを作り、次の内容を入力する。cna-webというラベルで、フロントエンドのWebサービス用のKubernetes Serviceを作るマニフェストである。
#service.yaml
apiVersion: v1
kind: Service
metadata:
  name: cna-web
spec:
  type: ClusterIP
  selector:
    app: cna-web
  ports:
    - port: 3000 # SERVICE exposed port
      name: http # SERVICE port name
      protocol: TCP # The protocol the SERVICE will listen to
      targetPort: 3000
4. Apply the service manifest to the Kubernetes cluster with this command. A message indicates that the service object was successfully created.
4. 次のコマンドで、サービスマニフェストをKubernetesクラスターへ適用する。serviceオブジェクトの作成に成功したというメッセージが表示される。
kubectl apply -f ./web-service.yaml5. Confirm the service deployment was successful. The Services for each microservice should be listed. IP addresses (CLUSTER-IP) and ports should also be specified for each microservice.
5. サービスの配置が成功したことを確認する。各マイクロサービスのServiceが一覧に表示されるはずである。それぞれのIPアドレス(CLUSTER-IP)とポートも指定されるはずである。
kubectl get service cna-express
kubectl get service
Create and Apply the Ingress Controllers
Ingressコントローラーを作成し、適用する
Now that the services are created with assigned IP addresses and exposed ports, Ingress controllers are used to define how the deployed microservices are exposed to outside requests.
サービスにIPアドレスを割り当て、ポートを公開できたので、Ingressコントローラーで、配置したマイクロサービスを外部の要求にどう公開するかを定義する。
1. First, enable the Kubernetes cluster so that it can use HTTP Application Routing with the following command.
1. まず、次のコマンドで、KubernetesクラスターがHTTP Application Routingを使えるようにする。
az aks enable-addons --resource-group $RESOURCEGROUP \
--name $CLUSTERNAME --addons http_application_routing
2. Next, configure and deploy the Ingress controller. As mentioned earlier, an FQDN is provided for a set of Pods of the Kubernetes cluster. Run this command to obtain this FQDN. The output is the FQDN that is used to expose the microservices to outside requests.
2. 次に、Ingressコントローラーを設定し、配置する。先に述べたように、Kubernetesクラスターのポッドの集合には、FQDNが与えられる。次のコマンドで取得する。出力されるFQDNは、マイクロサービスを外部の要求に公開するために使う。
az aks show --resource-group $RESOURCEGROUP --name $CLUSTERNAME -o tsv \
--query
addonProfiles.httpApplicationRouting.config.HTTPApplicationRoutingZoneName
3. Create the Ingress descriptor file, express-ingress.yaml, for the back-end service labeled as cna-express and add the following content. Note that the host includes the FQDN that was obtained in the previous step. It is prepended with cna-express making it unique for the back-end service.
英語のヒント
3. cna-expressというラベルを持つバックエンドサービス用に、Ingress記述ファイルexpress-ingress.yamlを作成し、次の内容を追加する。hostには、前の手順で取得したFQDNが含まれる。その先頭にcna-expressを付け、バックエンドサービス固有のものにする。
#ingress.yaml
apiVersion: networking.k8s.io/v1
kind: Ingress
metadata:
  name: cna-express
  annotations:
    kubernetes.io/ingress.class: addon-http-application-routing
spec:
  rules:
  - host: cna-express.8776bb8bc0324e10946c.eastus.aksapp.io
    http:
      paths:
      - path: / # Which path is this rule referring to
        pathType: Prefix
        backend: # How the ingress will handle the requests
          service:
            name: cna-express # Which service the request will be forwarded to
            port:
              name: http # Which port in that service
4. Apply the Ingress manifest to the Kubernetes cluster with this command. A message indicates that the Ingress object was successfully created.
4. 次のコマンドで、IngressマニフェストをKubernetesクラスターへ適用する。Ingressオブジェクトの作成に成功したというメッセージが表示される。
kubectl apply -f ./express-ingress.yaml5. Create the Ingress descriptor file, web-ingress.yaml, for the front-end web service labeled as cna-web and add the following content. Note that the host includes the FQDN that was obtained in the previous step. It is prepended with cna-web making it unique for the front-end web service.
5. cna-webというラベルを持つフロントエンドのWebサービス用に、Ingress記述ファイルweb-ingress.yamlを作成し、次の内容を追加する。hostには、前の手順で取得したFQDNが含まれる。その先頭にcna-webを付け、フロントエンドのWebサービス固有のものにする。
#ingress.yaml
apiVersion: networking.k8s.io/v1
kind: Ingress
metadata:
  name: cna-web
  annotations:
    kubernetes.io/ingress.class: addon-http-application-routing
spec:
  rules:
  - host: cna-web.8776bb8bc0324e10946c.eastus.aksapp.io
    http:
      paths:
      - path: / # Which path is this rule referring to
        pathType: Prefix
        backend: # How the ingress will handle the requests
          service:
            name: cna-express # Which service the request will be forwarded to
            port:
              name: http # Which port in that service
6. Apply the ingress manifest to the Kubernetes cluster with this command. A message indicates that the Ingress object was successfully created.
6. 次のコマンドで、IngressマニフェストをKubernetesクラスターへ適用する。Ingressオブジェクトの作成に成功したというメッセージが表示される。
kubectl apply -f ./web-ingress.yaml7. Confirm the Ingresses were deployed successfully with the commands below. The Ingresses for both microservices will display host names (HOSTS) that are unique for each microservice.
英語のヒント
7. 次のコマンドで、Ingressが正常に配置されたことを確認する。2つのマイクロサービスのIngressには、それぞれ固有のホスト名(HOSTS)が表示される。
kubectl get ingress cna-express
kubectl get ingress
8. The command below queries Azure for the FQDN that was created earlier. It serves as the ZoneName. The command also returns the ResourceGroup value that is used to access the microservices. Run the command below and make a note of the ZoneName and ResourceGroup values.
8. 次のコマンドは、先に作成したFQDNをAzureへ問い合わせる。そのFQDNがZoneNameになる。また、マイクロサービスへのアクセスに使うResourceGroupの値も返す。コマンドを実行し、ZoneNameとResourceGroupを控える。
az network dns zone list --output table9. Substitute the values for ResourceGroup and ZoneName obtained in the previous step for <resource-group> and <zone-name>, respectively, in the command that follows. Execute the edited command in the Cloud Shell, which results in the table shown. Two records are added for cna-express and two for cna-web which show in the Name column.
9. 次のコマンドの<resource-group>と<zone-name>を、前の手順で取得したResourceGroupとZoneNameで、それぞれ置き換える。編集したコマンドをCloud Shellで実行すると、次の表が表示される。cna-express用に2件、cna-web用に2件のレコードが追加され、Name列に表示される。
az network dns record-set list -g <resource-group> -z <zone-name> --output table
attribution: Copyright Rice University, OpenStax, under CC BY 4.0 license · CC BY 4.0 · Source出典
(attribution: Copyright Rice University, OpenStax, under CC BY 4.0 license)
(出典:Copyright Rice University, OpenStax、CC BY 4.0ライセンス)
10. In a browser, access the back-end service using the URL that is generated (e.g., http://cna-express.8776bb8bc0324e10946c.eastus.aksapp.io/inventory/1), which includes the route that was implemented as part of the REST API for the microservice. The back-end service receives requests in JSON format to create and store inventory records into the datastore. It also retrieves inventory records from the datastore and renders them in JSON format.
英語のヒント
10. ブラウザーで、生成されたURL、たとえばhttp://cna-express.8776bb8bc0324e10946c.eastus.aksapp.io/inventory/1を使い、バックエンドサービスへアクセスする。このURLには、マイクロサービスのREST APIの一部として実装したルートが含まれる。バックエンドサービスは、JSON形式の要求を受け取り、在庫レコードを作成してデータストアへ保存する。また、データストアから在庫レコードを取り出し、JSON形式で表示する。

attribution: Copyright Rice University, OpenStax, under CC BY 4.0 license · CC BY 4.0 · Source出典
(attribution: Copyright Rice University, OpenStax, under CC BY 4.0 license)
(出典:Copyright Rice University, OpenStax、CC BY 4.0ライセンス)
11. In a browser, access the front-end web service using the URL that is generated (e.g., http://cna-web.8776bb8bc0324e10946c.eastus.aksapp.io). The front-end web service renders inventory records from the datastore to a web page.
11. ブラウザーで、生成されたURL、たとえばhttp://cna-web.8776bb8bc0324e10946c.eastus.aksapp.ioを使い、フロントエンドのWebサービスへアクセスする。データストアの在庫レコードが、Webページに表示される。
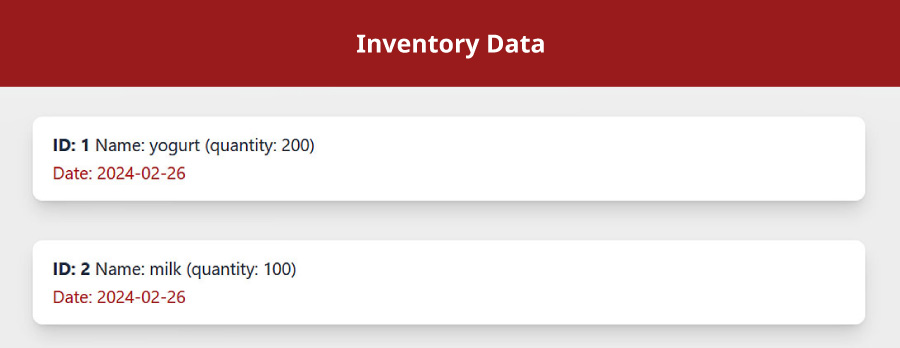
rendered using Kubernetes; attribution: Copyright Rice University, OpenStax, under CC BY 4.0 license · CC BY 4.0 · Source出典
(rendered using Kubernetes; attribution: Copyright Rice University, OpenStax, under CC BY 4.0 license)
(Kubernetesで描画。出典:Copyright Rice University, OpenStax、CC BY 4.0ライセンス)