第12章クラウドネイティブアプリケーション開発
Install and Test the Kuard Demo ApplicationKuardのデモアプリケーションをインストールして試す
Now that the Docker engine, Docker Compose, Kubectl, and Tanzu are all installed, the next step is to install the Kuard demo application.
英語のヒント
Dockerエンジン、Docker Compose、Kubectl、Tanzuがすべてインストールできたので、次はKuardのデモアプリケーションをインストールする。
Create Required AWS Secret and Access Keys
必要なAWSのシークレットキーとアクセスキーを作る
AWS secret keys are used to manage AWS resources via the AWS CLI. AWS CLI is a command-line interface used to manage Amazon cloud services. Access keys are used in the Tanzu configuration to provision and configure the Tanzu Management Cluster. An RSA key pair is also used in the Tanzu configuration to communicate with the Tanzu Management Cluster.
英語のヒント
AWSのシークレットキーは、AWS CLIを通じてAWSの資源を管理するために使う。AWS CLIは、Amazonのクラウドサービスを管理するコマンドラインインターフェースである。アクセスキーはTanzuの設定で使い、Tanzu Management Clusterを用意して設定する。RSA鍵ペアもTanzuの設定で使い、Tanzu Management Clusterと通信する。
1. In the AWS shell, install awscli. First, download the AWS CLI zip file with the curl command below.
1. AWSのシェルでawscliをインストールする。まず、次のcurlコマンドでAWS CLIのZIPファイルをダウンロードする。
curl "https://awscli.amazonaws.com/awscli-exe-linux-x86_64.zip" -o "awscliv2.zip"◦ Install the unzip CLI utility that is used to unpack the downloaded awscliv2.zip file. Run the command below:
◦ ダウンロードしたawscliv2.zipを展開する、unzipというCLIユーティリティーをインストールする。次のコマンドを実行する。
sudo apt install unzip◦ Unzip the awscliv2.zip file with the command below.
◦ 次のコマンドで、awscliv2.zipファイルを展開する。
unzip awscliv2.zip◦ Install the unpackaged AWS CLI with the command below.
◦ 展開したAWS CLIを、次のコマンドでインストールする。
sudo ./aws/install◦ Run the command below to verify that the AWS CLI was installed successfully. The version should be displayed.
◦ 次のコマンドで、AWS CLIが正しくインストールされたことを確認する。版が表示されるはずである。
aws - version2. In the AWS Portal under Access management, click on Security credentials. Click on Create access key to generate the key. Make a note of the key pairs as they will be added to the Tanzu Management Cluster settings.
英語のヒント
2. AWSポータルのAccess management(アクセス管理)で、Security credentials(セキュリティー認証情報)をクリックする。Create access key(アクセスキーを作成)を押し、キーを生成する。Tanzu Management Clusterの設定に加えるため、キーの組を控えておく。
3. Finally, generate an RSA key pair. The name used in this example is tanzu-key-pair. Make a note of the name of the RSA key pair as it will be added to the Tanzu Management Cluster settings.
3. 最後に、RSA鍵ペアを生成する。この例では、tanzu-key-pairという名前を使う。Tanzu Management Clusterの設定に加えるため、RSA鍵ペアの名前を控えておく。
aws ec2 create-key-pair \
  --key-name tanzu-key-pair \
  --key-type rsa \
  --key-format pem \
  --query "KeyMaterial" \
  --output text > tanzu-key-pair.pem
Create the Tanzu Management Cluster Configuration
Tanzu Management Clusterの設定を作る
Now that the environment to run the Tanzu Management Cluster is set up, the next step is to create a Tanzu Management Cluster. A management cluster configuration file is needed. One way to create a management cluster configuration file is to use the Tanzu installer, which is a web page that is used to generate the configuration file.14
英語のヒント
Tanzu Management Clusterを動かす環境が整ったので、次は管理クラスターを作る。そのためには、管理クラスターの設定ファイルが必要になる。作成方法の1つは、Tanzuインストーラーを使うことである。これは、設定ファイルを生成するためのウェブページである。14
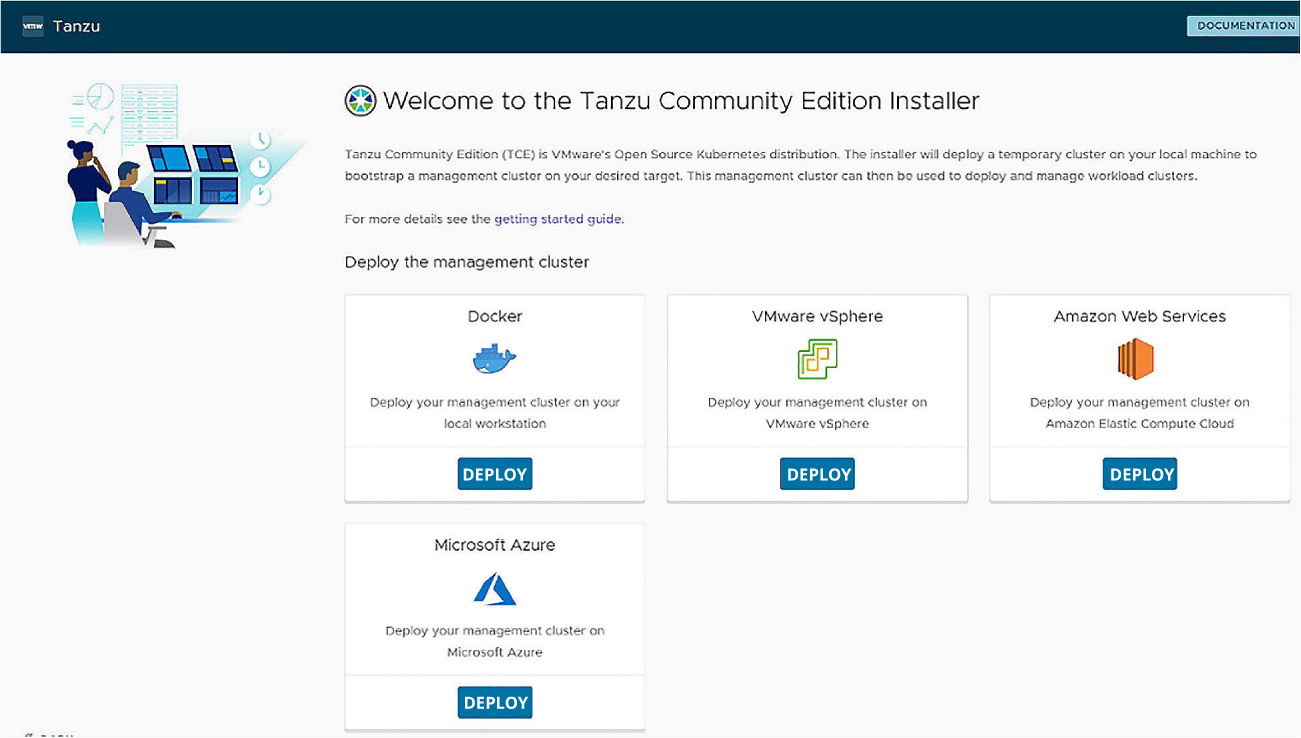
1. Use the Tanzu installer to create the management cluster configuration file. Launch the Tanzu installer web page with the command below. A browser page automatically launches.
1. Tanzuインストーラーで、管理クラスターの設定ファイルを作る。次のコマンドでTanzuインストーラーのウェブページを起動すると、ブラウザーのページが自動的に開く。
tanzu management-cluster create14 See VMware Tanzu Kubernetes Grid documentation at https://docs.vmware.com/en/VMware-Tanzu-Kubernetes-Grid/1.5/ vmware-tanzu-kubernetes-grid-15/GUID-mgmt-clusters-config-aws.html.
14 VMware Tanzu Kubernetes Gridの文書(https://docs.vmware.com/en/VMware-Tanzu-Kubernetes-Grid/1.5/vmware-tanzu-kubernetes-grid-15/GUID-mgmt-clusters-config-aws.html)を参照。
credit: Tanzu, under Mozilla Public License 2.0 · MPL 2.0(原著の出典表記) · Source出典
(credit: Tanzu, under Mozilla Public License 2.0)
(クレジット:Tanzu、Mozilla Public License 2.0)
2. Select Deploy on Amazon Web Services. This generates a configuration file that deploys the cluster on the Amazon EC2 instance that was created earlier.
英語のヒント
2. Deploy on Amazon Web Servicesを選ぶ。先ほど作ったAmazon EC2インスタンスにクラスターを配備する、設定ファイルが生成される。
3. Under the IaaS Provider section, select the REGION that is also used as a location for the EC2 instance.
3. IaaS Providerの欄で、EC2インスタンスの設置場所と同じREGIONを選ぶ。
4. Under the Management Cluster Settings section, make sure that Bastion Host is unchecked (disabled). For EC2 KEY PAIR, enter the name of the RSA key pair that was created earlier. For this example, the name used in this example is tanzu-key-pair. Select t3a.large for the AZ1 WORKER NODE INSTANCE TYPE.
英語のヒント
4. Management Cluster Settingsで、Bastion Hostのチェックが外れている、つまり無効になっていることを確かめる。EC2 KEY PAIRには、先ほど作成したRSA鍵ペアの名前を入力する。この例ではtanzu-key-pairである。AZ1 WORKER NODE INSTANCE TYPEにはt3a.largeを選ぶ。
5. Under the Identity Management section, disable Enable Identity Management Settings.
5. Identity Managementで、Enable Identity Management Settingsを無効にする。
6. Under the OS Image section, select ubuntu-20-04-amd64 as the OS IMAGE.
6. OS Imageで、OS IMAGEとしてubuntu-20-04-amd64を選ぶ。
7. Click Review Configuration. Table 12.4 shows the complete list of settings expected for configuring the Tanzu Management Cluster.
7. Review Configurationをクリックする。表12.4は、Tanzu Management Clusterの構成に必要とされる設定の全一覧を示す。
IaaS Provider Settings IaaS事業者の設定 | |
|---|---|
IaaS Provider IaaS事業者 | Validate the AWS provider credentials for Tanzu Community Edition Tanzu Community EditionのAWS事業者の認証情報を検証する |
AWS CREDENTIAL PROFILE AWS CREDENTIAL PROFILE(AWS認証情報プロファイル) | Default |
REGION REGION(リージョン) | us-east-2 |
VPC for AWS settings AWS用VPCの設定 | |
VPC for AWS AWS用VPC | Specify VPC settings for AWS AWS用のVPC設定を指定する |
VPC CIDR | 10.0.0.0/16 |
Table 12.4 Configurations for Tanzu
表12.4 Tanzuの設定
IaaS Provider Settings IaaS事業者の設定 | |
|---|---|
Management Cluster Settings 管理クラスターの設定 | |
Management Cluster Settings 管理クラスターの設定 | Development cluster selected: 1 node control plane 開発用クラスターを選択:制御プレーンは1ノード |
DEV INSTANCE TYPE DEV INSTANCE TYPE(開発用インスタンスの種類) | t3a.large |
MANAGEMENT CLUSTER NAME MANAGEMENT CLUSTER NAME(管理クラスター名) | tkg-cnamgmt-cluster-aws |
EC2 KEY PAIR EC2 KEY PAIR(EC2キーペア) | tanzu-key-pair |
ENABLE MACHINE HEALTH CHECKS ENABLE MACHINE HEALTH CHECKS(マシンの健全性確認を有効にする) | Yes |
ENABLE BASTION HOST ENABLE BASTION HOST(踏み台ホストを有効にする) | No |
ENABLE AUDIT LOGGING ENABLE AUDIT LOGGING(監査ログを有効にする) | No |
AUTOMATE CREATION OF AWS CLOUDFORMATION STACK AUTOMATE CREATION OF AWS CLOUDFORMATION STACK(AWS CloudFormationスタックの作成を自動化する) | Yes |
AVAILABILITY ZONE 1 AVAILABILITY ZONE 1(アベイラビリティゾーン1) | us-east-2c |
WORKER NODE INSTANCE TYPE 1 WORKER NODE INSTANCE TYPE 1(ワーカーノードのインスタンスの種類1) | t3a.large |
PROD INSTANCE TYPE PROD INSTANCE TYPE(本番用インスタンスの種類) | |
Metadata Settings メタデータの設定 | |
Metadata メタデータ | Specify metadata for the management cluster 管理クラスターのメタデータを指定する |
LOCATION (OPTIONAL) LOCATION (OPTIONAL)(場所、省略可) | |
DESCRIPTION (OPTIONAL) DESCRIPTION (OPTIONAL)(説明、省略可) | |
LABELS LABELS(ラベル) | |
Kubernetes Network Settings Kubernetesネットワークの設定 | |
Kubernetes Network Kubernetesネットワーク | Cluster Pod CIDR: 100.96.0.0/11 クラスターのポッドCIDR:100.96.0.0/11 |
CNI PROVIDER CNI PROVIDER(CNI提供元) | Antrea |
CLUSTER SERVICE CIDR CLUSTER SERVICE CIDR(クラスターのサービスCIDR) | 100.64.0.0/13 |
CLUSTER POD CIDR CLUSTER POD CIDR(クラスターのポッドCIDR) | 100.96.0.0/11 |
ENABLE PROXY SETTINGS ENABLE PROXY SETTINGS(プロキシ設定を有効にする) | No |
Table 12.4 Configurations for Tanzu
表12.4 Tanzuの設定
IaaS Provider Settings IaaS事業者の設定 | |
|---|---|
Identity Management Settings ID管理の設定 | |
Identity Management ID管理 | Specify identity management ID管理を指定する |
ENABLE IDENTITY MANAGEMENT SETTINGS ENABLE IDENTITY MANAGEMENT SETTINGS(ID管理設定を有効にする) | No |
OS Image Settings OSイメージの設定 | |
OS Image OSイメージ | OS Image: ubuntu-20.04-amd64 (ami-06159f2d2711f3434) OSイメージ:ubuntu-20.04-amd64 (ami-06159f2d2711f3434) |
OS IMAGE OS IMAGE(OSイメージ) | ubuntu-20.04-amd64 (ami-06159f2d2711f3434) |
Table 12.4 Configurations for Tanzu
表12.4 Tanzuの設定
8. Copy the generated CLI command to the clipboard (or click Deploy Management Cluster). Clicking on the Deploy Management Cluster button connects to the EC2 instance and provisions the Tanzu Management Cluster. Alternatively, the configuration file that was generated is copied into the /home/ ubuntu/.config/tanzu/tkg/clusterconfigs/ directory. In this example, the generated filename for the configuration file is kldlaarqyl.yaml. Run the copied command in the AWS shell to provision the Tanzu Management Cluster.
英語のヒント
8. 生成されたCLIコマンドをクリップボードへコピーするか、Deploy Management Clusterをクリックする。このボタンを押すとEC2インスタンスへ接続し、Tanzu Management Clusterを用意する。別の方法では、生成された設定ファイルを/home/ubuntu/.config/tanzu/tkg/clusterconfigs/ディレクトリーへコピーする。この例の設定ファイル名はkldlaarqyl.yamlである。コピーしたコマンドをAWSのシェルで実行し、Tanzu Management Clusterを用意する。
9. After the copied command is executed, a config file, with “config_” prepended as the filename, is generated, and copied into the kube-tkg/tmp/ directory.
英語のヒント
9. コピーしたコマンドを実行すると、ファイル名の先頭に「config_」が付いた設定ファイルが生成され、kube-tkg/tmp/ディレクトリーへコピーされる。
10. Run the command below to check the status of the Tanzu Management Cluster. Change <config_file> with the filename generated.
10. 次のコマンドで、Tanzu Management Clusterの状態を調べる。<config_file>を、生成されたファイル名に置き換える。
Kubectl get \ po.deploy.cluster.kubeadmcontrolplane,machine,machinedeployment\
-A --kubeconfig /home/ubuntu/.kube-tkg/tmp/<config_file>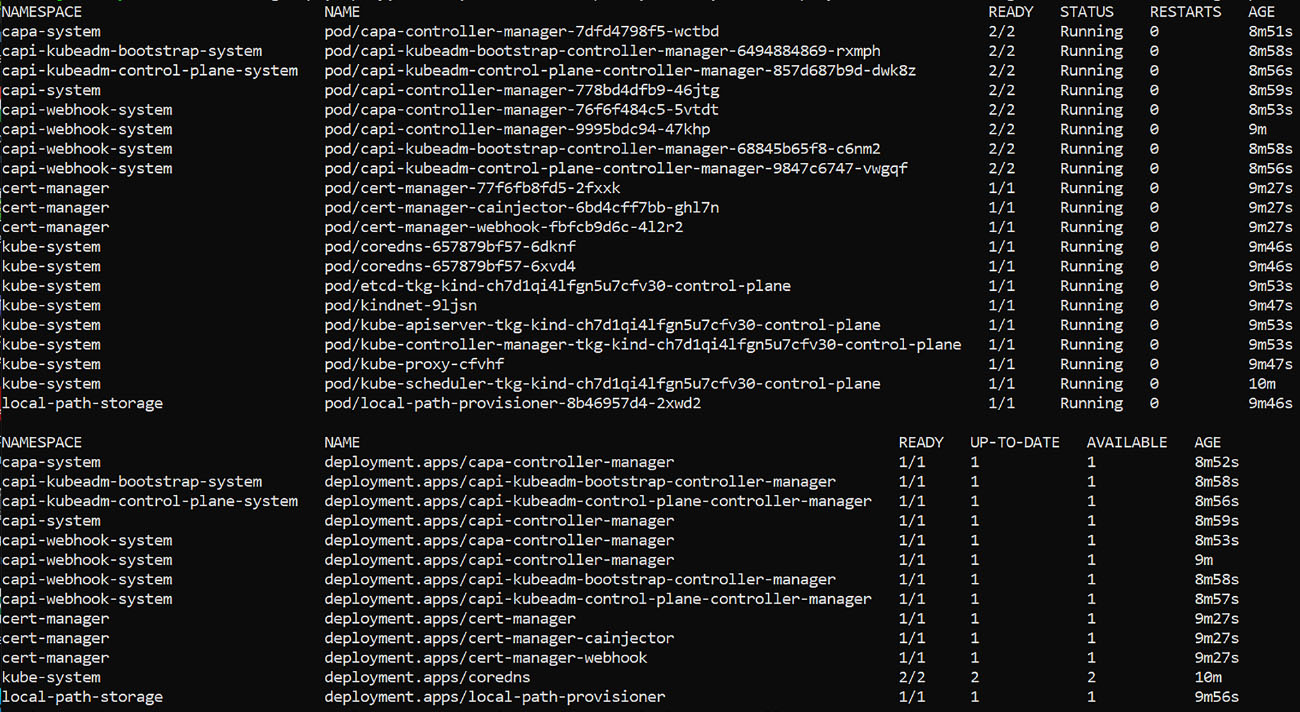
attribution: Copyright Rice University, OpenStax, under CC BY 4.0 license · CC BY 4.0 · Source出典
(attribution: Copyright Rice University, OpenStax, under CC BY 4.0 license)
(出典:著作権 Rice University、OpenStax。CC BY 4.0ライセンス)
Run the Kuard Demo Application
Kuardのデモアプリケーションを実行する
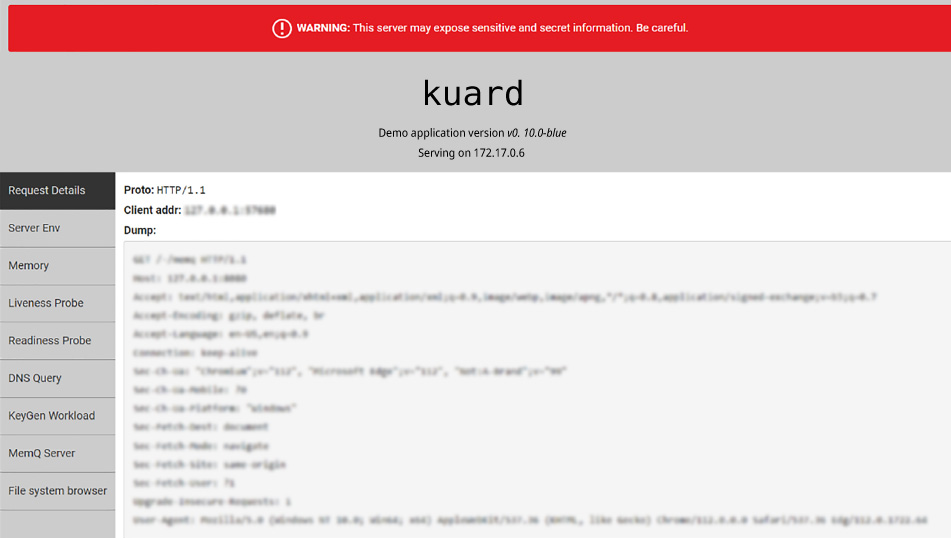
Kuard (Kubernetes Up and Running Demo) is a demo application that provides information about Kubernetes environments that are running. The Kuard demo application is deployed in the Tanzu Management Cluster as a containerized application.
英語のヒント
Kuard(Kubernetes Up and Running Demo)は、稼働中のKubernetes環境についての情報を示すデモアプリケーションである。Tanzu Management Clusterへ、コンテナー化されたアプリケーションとして配備する。
1. Run the command below to set the default context to the Tanzu cluster that was just created.
1. 次のコマンドで、既定のコンテキストを、先ほど作ったTanzuクラスターへ設定する。
kubectl config use-context tkg-cnamgmt-cluster-aws-admin@tkg-cnamgmt-cluster-aws2. Run the command below to pull the Kuard image and start a single instance of a Kuard Pod.
2. 次のコマンドでKuardのイメージを取得し、Kuard Podのインスタンスを1つ起動する。
kubectl run --restart=Never –image=gcr.io/kuar-demo/kuard-amd64:blue kuard3. Configure Kuard to listen on port 8080 and forward to port 8080 in the Kuard pod. First, run the command below to list the Pod and make note of the Pod name. The Pod name should be kuard and should be up and running.
英語のヒント
3. Kuardがポート8080で待ち受け、Kuard Pod内のポート8080へ転送するよう設定する。まず、次のコマンドでPodを一覧にし、その名前を控える。Pod名はkuardで、起動して稼働中のはずである。
kubectl get pods4. Run the command below to use port forwarding and expose the Kuard default port, 8080.
英語のヒント
4. 次のコマンドでポート転送を使い、Kuardの既定のポート8080を公開する。
kubectl port forward kuard 8080:80805. Launch the Kuard website in the browser using the URL http://localhost:8080.
5. ブラウザーでhttp://localhost:8080を開き、Kuardのウェブサイトを起動する。
credit: Kubernetes, under Mozilla Public License 2.0 · MPL 2.0(原著の出典表記) · Source出典
(credit: Kubernetes, under Mozilla Public License 2.0)
(クレジット:Kubernetes、Mozilla Public License 2.0)
Install and Run Octant
Octantをインストールして実行する
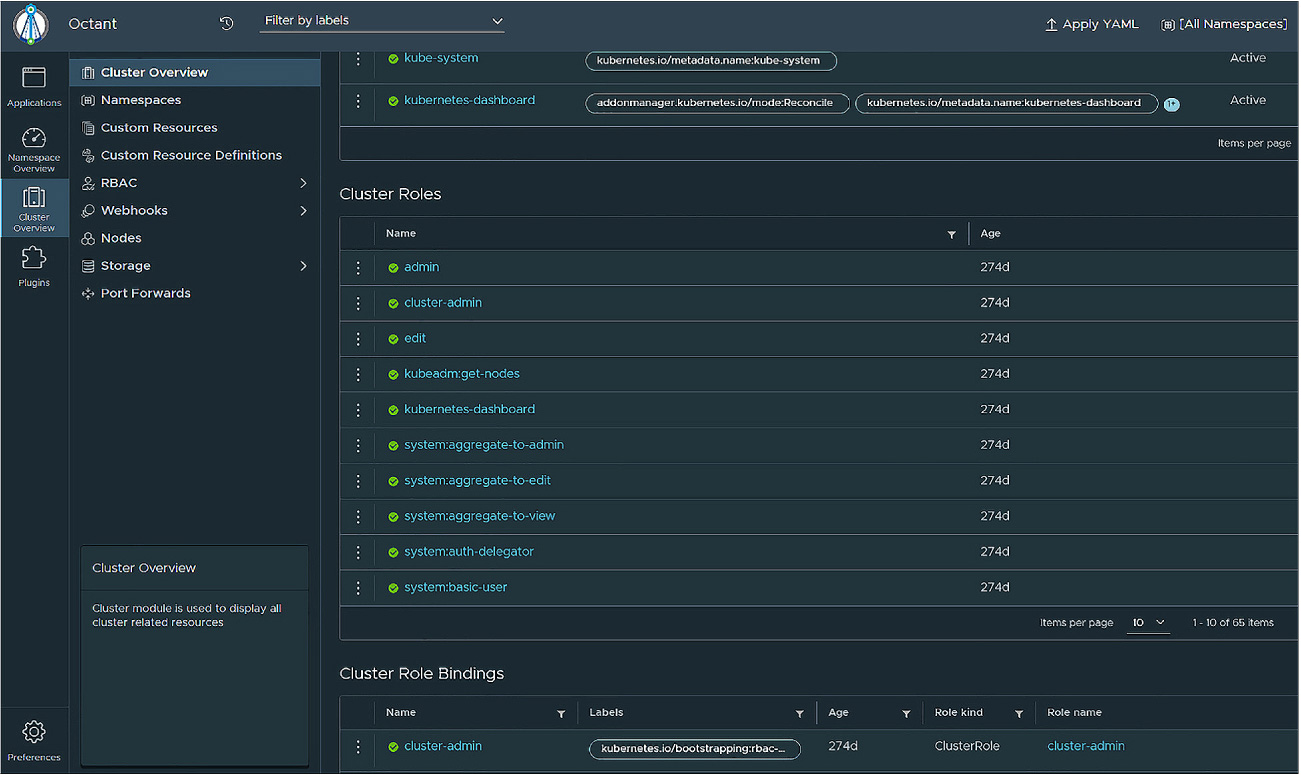
Octant is an open-source web interface for Kubernetes that is used to inspect Kubernetes clusters and applications deployed in them.
英語のヒント
Octantは、Kubernetesのクラスターと、その中に配備したアプリケーションを調べるための、オープンソースのウェブインターフェースである。
1. Run the command below to install Octant using Homebrew.
1. 次のコマンドで、Homebrewを使ってOctantをインストールする。
brew install octant2. Launch Octant by typing the command octant in the AWS shell. A browser window automatically launches.
2. AWSのシェルにoctantコマンドを入力して起動する。ブラウザーのウィンドウが自動的に開く。
credit: Octant, a VMware-backed project · 原著の利用条件・ソフトウェアの権利表示参照 · Source出典
(credit: Octant, a VMware-backed project)
英語のヒント
(クレジット:VMwareが支援するプロジェクト、Octant)