第12章クラウドネイティブアプリケーション開発
FaaS Deployment of a Sample Cloud-Native Applicationクラウドネイティブアプリケーションの例をFaaSへ配備する
The following example15 illustrates FaaS deployment of a cloud-native application that consists of two event-driven workloads. The first serves as a simulator that sends data to an event hub. This is the Azure FaaS producer function. A second connects to this event hub to trigger storing the events in a datastore. This is the Azure FaaS consumer function. Both FaaS functions are deployed as Azure Function Apps.
英語のヒント
次の例15は、イベント駆動の2つのワークロードからなるクラウドネイティブアプリケーションを、FaaSへ配備する方法を示す。1つ目は、イベントハブへデータを送るシミュレーターとして働く。これがAzure FaaSの生成側の関数である。2つ目は、そのイベントハブへ接続し、イベントをデータストアへ保存する処理を起こす。こちらがAzure FaaSの消費側の関数である。両方ともAzure Function Appとして配備する。
Azure Function App is an event-driven serverless compute platform without provision or managing infrastructure. The datastore used is an Azure Cosmos Database. Dashboards are then used to monitor the performance of the Azure FaaS functions. The architecture of the FaaS deployment of the cloud-native application is shown in Figure 12.40.
英語のヒント
Azure Function Appは、基盤の用意や管理を必要としない、イベント駆動のサーバーレス計算プラットフォームである。データストアにはAzure Cosmos Databaseを使う。その後、ダッシュボードでAzure FaaS関数の性能を監視する。図12.40は、クラウドネイティブアプリケーションをFaaSへ配備する構成を示す。

attribution: Copyright Rice University, OpenStax, under CC BY 4.0 license · CC BY 4.0 · Source出典
Figure 12.40 FaaS functions of a cloud-native application are deployed in Azure. (attribution: Copyright Rice University, OpenStax, under CC BY 4.0 license)
図12.40 クラウドネイティブアプリケーションのFaaS関数をAzureへ配備する。(出典:著作権 Rice University、OpenStax。CC BY 4.0ライセンス)
FaaS Environment SetupFaaSの環境を準備する
Setting specific environment variables makes it easier to run these commands. Run the commands below to set the environment variables. For this example, rg-atafunctions-westus2 was used for the resource group, ncafaaseventhub was used for the event hub namespace, ncafaaseventhub was used for the event hub name, ncafaasauth was used for the event hub authorization rule, ncafaasdbusr was used for the Cosmos database account username, ncafaasstor was used for the storage account name, ncafaasapp was used for the FaaS function name (for the first Azure function), and westus2 was used for the location.
英語のヒント
特定の環境変数を設定すると、これらのコマンドを実行しやすくなる。次のコマンドで環境変数を設定する。この例では、資源グループにrg-atafunctions-westus2、イベントハブの名前空間にncafaaseventhub、イベントハブ名にncafaaseventhub、イベントハブの承認規則にncafaasauthを使う。Cosmosデータベースのアカウント利用者名はncafaasdbusr、ストレージアカウント名はncafaasstor、FaaS関数名(最初のAzure関数)はncafaasapp、場所はwestus2とする。
15 Sample based off tutorial https://learn.microsoft.com/en-us/training/modules/deploy-real-time-event-driven-app/
15 次のチュートリアルに基づく例:https://learn.microsoft.com/en-us/training/modules/deploy-real-time-event-driven-app/
RESOURCE_GROUP=<value>
EVENT_HUB_NAMESPACE=<value>
EVENT_HUB_NAME=<value>
EVENT_HUB_AUTHORIZATION_RULE=<value>
COSMOS_DB_ACCOUNT=<value>
STORAGE_ACCOUNT=<value>
FUNCTION_APP=<value>
LOCATION=<value>
Create a Datastore for the Event-Driven FaaS Cloud-Native Applicationイベント駆動のFaaSクラウドネイティブアプリケーション用データストアを作る
The producer function simulates and sends data to an Azure event hub. The consumer function listens for events of a specific namespace in the Azure event hub and processes and stores them in an Azure Cosmos database. The first step is to create an Azure Cosmos DB datastore. Once the datastore is created, the next step is to create and configure an Azure event hub.
英語のヒント
生成側の関数はデータを模擬生成し、Azureイベントハブへ送る。消費側の関数は、イベントハブの特定の名前空間でイベントを待ち受け、処理してAzure Cosmosデータベースへ保存する。最初に、Azure Cosmos DBのデータストアを作る。それができたら、次にAzureイベントハブを作成・設定する。
1. Run the commands below to create the Azure Cosmos DB datastore.
1. 次のコマンドで、Azure Cosmos DBのデータストアを作る。
az cosmosdb create\
  --resource-group $RESOURCE_GROUP\
  --name $COSMOS_DB_ACCOUNT

az cosmosdb sql database create\
  --resource-group $RESOURCE_GROUP\
  --account-name $COSMOS_DB_ACCOUNT \
  --name TelemetryDb

az cosmosdb sql container create\
  --resource-group $RESOURCE_GROUP\
  --account-name $COSMOS_DB_ACCOUNT\
  --database-name TelemetryDb\
  --name TelemetryInfo\
  --partition-key-path '/temperatureStatus'
Create and Configure an Event Hubイベントハブを作成・設定する
1. Run the commands below to create the event hub namespace, Azure event hub, and event hub authentication rule resources.
1. 次のコマンドで、イベントハブの名前空間、Azureイベントハブ、イベントハブの認証規則という資源を作る。
az eventhubs namespace create\
  --resource-group $RESOURCE_GROUP\
  --name $EVENT_HUB_NAMESPACE

az eventhubs eventhub create\
  --resource-group $RESOURCE_GROUP\
  --name $EVENT_HUB_NAME\
  --namespace-name $EVENT_HUB_NAMESPACE\
  --message-retention 1

az eventhubs eventhub authorization-rule create\
  --resource-group $RESOURCE_GROUP
  --name $EVENT_HUB_AUTHORIZATION_RULE
  --eventhub-name $EVENT_HUB_NAME
  --namespace-name $EVENT_HUB_NAMESPACE \
  --rights Listen Send
2. Run these commands below to create the storage account and function app resources.
2. 次のコマンドで、ストレージアカウントとFunction Appの資源を作る。
az storage account create\
  --resource-group $RESOURCE_GROUP\
  --name $STORAGE_ACCOUNT"p" \
  --sku Standard_LRS

az functionapp create\
  --resource-group $RESOURCE_GROUP\
  --name $FUNCTION_APP"-p"\
  --storage-account $STORAGE_ACCOUNT"p" \
  --consumption-plan-location $LOCATION\
  --runtime java\
  --functions-version 4
Create, Build, and Deploy the FaaS Producer FunctionFaaSの生成側の関数を作成・ビルド・配備する
A few resources need to be created for the FaaS producer function. First, a storage account is created. The FaaS producer function needs to connect to the Azure event hub. Connection strings need to be generated for this purpose. Finally, the FaaS producer function is built as a maven project and then deployed as an Azure Function App.
英語のヒント
FaaSの生成側の関数には、いくつかの資源を作る必要がある。まず、ストレージアカウントを作る。この関数はAzureイベントハブへ接続する必要があり、そのための接続文字列も生成しなければならない。最後に、関数をMavenプロジェクトとしてビルドし、Azure Function Appとして配備する。
Set Up Storage for the Consumer Function
消費側の関数用のストレージを用意する
1. Run the commands below to create the connection strings that are used to access the storage account for the event hub.
1. 次のコマンドで、イベントハブ用のストレージアカウントへアクセスするための接続文字列を作る。
AZURE_WEB_JOBS_STORAGE=$(\
az storage account show-connection-string\
  --resource-group $RESOURCE_GROUP\
  --name $STORAGE_ACCOUNT"p"\
  --query connectionString\
  --output tsv)

EVENT HUB_CONNECTION_STRING=$(\
az eventhubs eventhub authorization-rule keys list\
  --resource-group $RESOURCE_GROUP\
  --name $EVENT_HUB_AUTHORIZATION_RULE\
  --eventhub-name $EVENT_HUB_NAME\
  --namespace-name $EVENT_HUB_NAMESPACE\
  --query primaryConnectionString\
  --output tsv)
2. Run the commands below to obtain the connection strings that were created in the previous step. Make a note of these connection strings as they will be used later.
英語のヒント
2. 次のコマンドで、前の手順で作成した接続文字列を取得する。後で使うため、控えておく。
echo $AZURE_WEB_JOBS_STORAGE
echo $EVENT_HUB_CONNECTION_STRING
3. The connection strings that were generated for the Azure Web Jobs Storage and event hub in the previous step need to be added as application settings to the Azure Function App account in the command. Run the command below with these values inserted to create the Function App. A notification to the console indicates that the Function App was built successfully.
英語のヒント
3. 前の手順で生成したAzure Web Jobs Storageとイベントハブの接続文字列を、コマンド内のAzure Function Appアカウントに、アプリケーション設定として追加する必要がある。これらの値を入れた次のコマンドを実行し、Function Appを作る。コンソールへの通知が、Function Appのビルド成功を示す。
az functionapp config appsettings set\
  --resource-group $RESOURCE_GROUP\
  --name $FUNCTION_APP"-p" \
  --settings\
AzureWebJobsStorage=$AZURE_WEB_JOBS_STORAGE\
EventHubConnectionString=$EVENT_HUB_CONNECTION_STRING
Build and Deploy the FaaS Producer Function
FaaSの生成側の関数をビルドして配備する
Now that the Azure resources, such as the event hub, Azure Function App, and Storage account, have been created and configured, the next step is to create an Azure FaaS function project for the FaaS producer function. Maven is used to build the project.
イベントハブ、Azure Function App、ストレージアカウントなどのAzure資源が作成・設定できたので、次はFaaSの生成側の関数用に、Azure FaaS関数のプロジェクトを作る。プロジェクトのビルドにはMavenを使う。
1. Run the command below to create and build the function project. The telemetry-functions-producer/ directory is generated along with the files for the project. A Build Success message indicating the build was successful should appear in the console.
英語のヒント
1. 次のコマンドで関数プロジェクトを作成・ビルドする。telemetry-functions-producer/ディレクトリーが、プロジェクトのファイルとともに生成される。ビルド成功を示すBuild Successメッセージが、コンソールに表示されるはずである。
mvn archetype:generate -batch-mode\
  -DarchetypeGroupid=com.microsoft.azure\
  -Darchetype ArtifactId=azure-functions-archetype\
  -DappName=$FUNCTION_APP"-p"\
  -DresourceGroup=$RESOURCE_GROUP\
  -DappRegion=$LOCATION\
  -DappServicePlanName=$LOCATION"plan" \
  -Dgroupid=com.learn\
  -DartifactId=telemetry-functions-producer
2. Run the command below to add application settings from the Azure function into the function project local.settings.json file located in the telemetry-functions-producer/ root directory.
2. 次のコマンドで、Azure関数からアプリケーション設定を取得し、telemetry-functions-producer/のルートディレクトリーにある、関数プロジェクトのlocal.settings.jsonへ追加する。
func azure functionapp fetch-app-settings $FUNCTION_APP”-p”3. Navigate to the telemetry-functions-producer/src/main/java/com/learn/ directory. Edit the Function.java file and replace all the code in it with the code that follows. The code declares a Function that establishes a connection to the Azure event hub.
英語のヒント
3. telemetry-functions-producer/src/main/java/com/learn/ディレクトリーへ移動する。Function.javaを編集し、全コードを次のものへ置き換える。このコードは、Azureイベントハブとの接続を確立するFunctionを宣言する。
package com.learn;
import com.microsoft.azure.functions.annotation.EventHubOutput;
import com.microsoft.azure.functions.annotation.FunctionName;
import com.microsoft.azure.functions.annotation.TimerTrigger;
import com.microsoft.azure.functions.ExecutionContext;

public class Function {

  @FunctionName("generatesSensorData")
  @EventHubOutput(
  name = "event",
  eventHubName = "", // blank because the value is included in the connection string
  connection = "EventHub ConnectionString")
  public Telemetryltem generateSensorData(
  @TimerTrigger(
  name = "timerInfo",
  schedule = "*/10*****") // every 10 seconds
  String timerInfo,
  final ExecutionContext context) {
    context.getLogger().info("Java Timer trigger function executed at:"+java.time.LocalDateTime.now()); double temperature = Math.random()* 100;
    double pressure = Math.random() * 50;
    return new Telemetryltem(temperature, pressure);
  }
}
4. Create a file named TelemetryItem.java and add the code below. The code declares simulated data items that are pushed to the Azure event hub.
4. TelemetryItem.javaというファイルを作り、次のコードを加える。このコードは、Azureイベントハブへ送る模擬データ項目を宣言する。
package com.learn;
public class TelemetryItem {

  private String id;
  private double temperature;
  private double pressure;
  private boolean isNormalPressure;
  private status temperatureStatus;

  static enum status {
    COOL,
    WARM,
    HOT
  }

  public TelemetryItem(double temperature, double pressure) {
    this.temperature = temperature;
    this.pressure = pressure;
  }

  public String getId() {
    return id;
  }

  public double getTemperature() {
    return temperature;
  }

  public double getPressure() {
    return pressure;
  }

  @Override
  public String toString() {
    return "TelemetryItem={ id=" + id + ",temperature=" + temperature +
",pressure= " + pressure + "}";
  }

  public boolean isNormalPressure() {
    return isNormalPressure;
  }

  public void setNormalPressure(boolean isNormal) {
    this.isNormalPressure = isNormal;
  }
  public status getTemperatureStatus() {
    return temperatureStatus;
  }

  public void setTemperatureStatus(status temperatureStatus)
{
    this.temperatureStatus = temperatureStatus;
  }
}
5. In the telemetry-functions-producer/ directory, run the command below to build the function. A Build Success message appears in the console indicating the build was successful.
英語のヒント
5. telemetry-functions-producer/ディレクトリーで、次のコマンドを使って関数をビルドする。コンソールにBuild Successメッセージが現れ、ビルド成功を示す。
mvn clean package6. Run the command below to test the function and confirm it runs properly. The output shown indicates the function is running properly.
英語のヒント
6. 次のコマンドで関数をテストし、正しく動くことを確かめる。表示されている出力は、関数が正しく稼働していることを示す。
Mvn azure-functions:run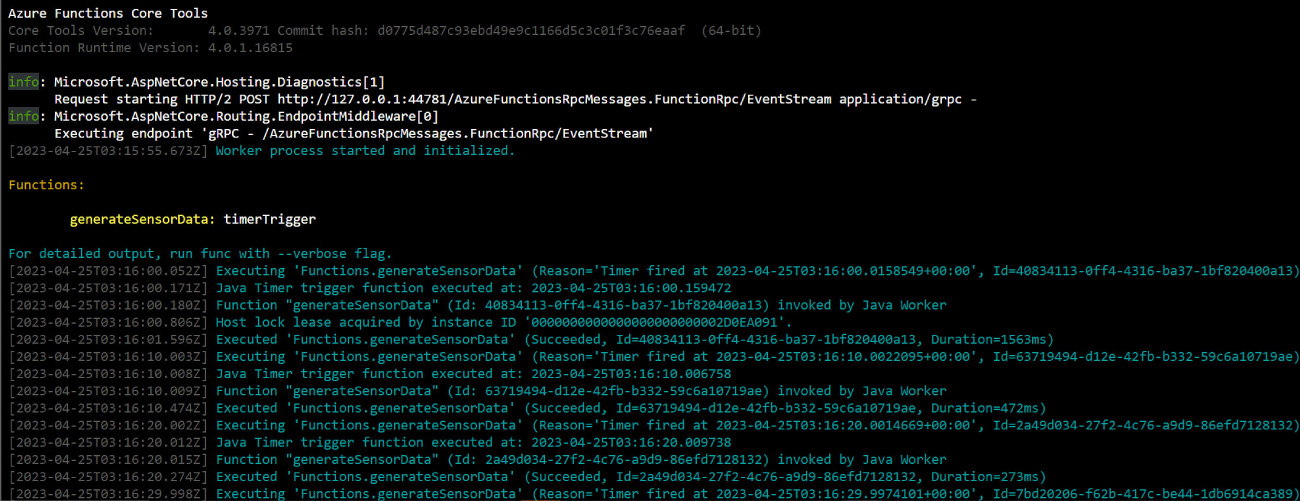
attribution: Copyright Rice University, OpenStax, under CC BY 4.0 license · CC BY 4.0 · Source出典
(attribution: Copyright Rice University, OpenStax, under CC BY 4.0 license)
(出典:著作権 Rice University、OpenStax。CC BY 4.0ライセンス)
7. Run the command below to deploy the FaaS producer function as an Azure Function App. Once the deployment is complete, the HTTP Trigger URLs are provided.
英語のヒント
7. 次のコマンドで、FaaSの生成側の関数をAzure Function Appとして配備する。配備が完了すると、HTTPトリガーのURLが示される。
mvn azure-functions:deploy